
In This Article
Overview
The Imports/Exports functionality in WiredUp allows you to efficiently manage data transfer in and out of the system. You can import data to bulk-update or add information to your WiredUp instance, export data for reporting and analysis purposes, and schedule recurring exports to be automatically sent to designated recipients. This article provides step-by-step instructions for adding Imports, Exports, and Scheduled Exports in WiredUp.
Note: The import and export types available to you depend on your role permissions. System administrators can configure role-based access to Imports and Exports functionality through Administration > Roles. If you need access to specific import or export types, please contact your system administrator.
Prerequisites
Before importing data, ensure you have the correct template file for your import type. Using the correct template ensures that your data is formatted properly and will be processed successfully by the system. You can download the appropriate template from the Import Template icon.
Add an Import
Imports allow you to add or update large amounts of data in WiredUp using a structured file format. This is particularly useful when you need to make bulk changes or add multiple records at once.
To add an import to WiredUp:
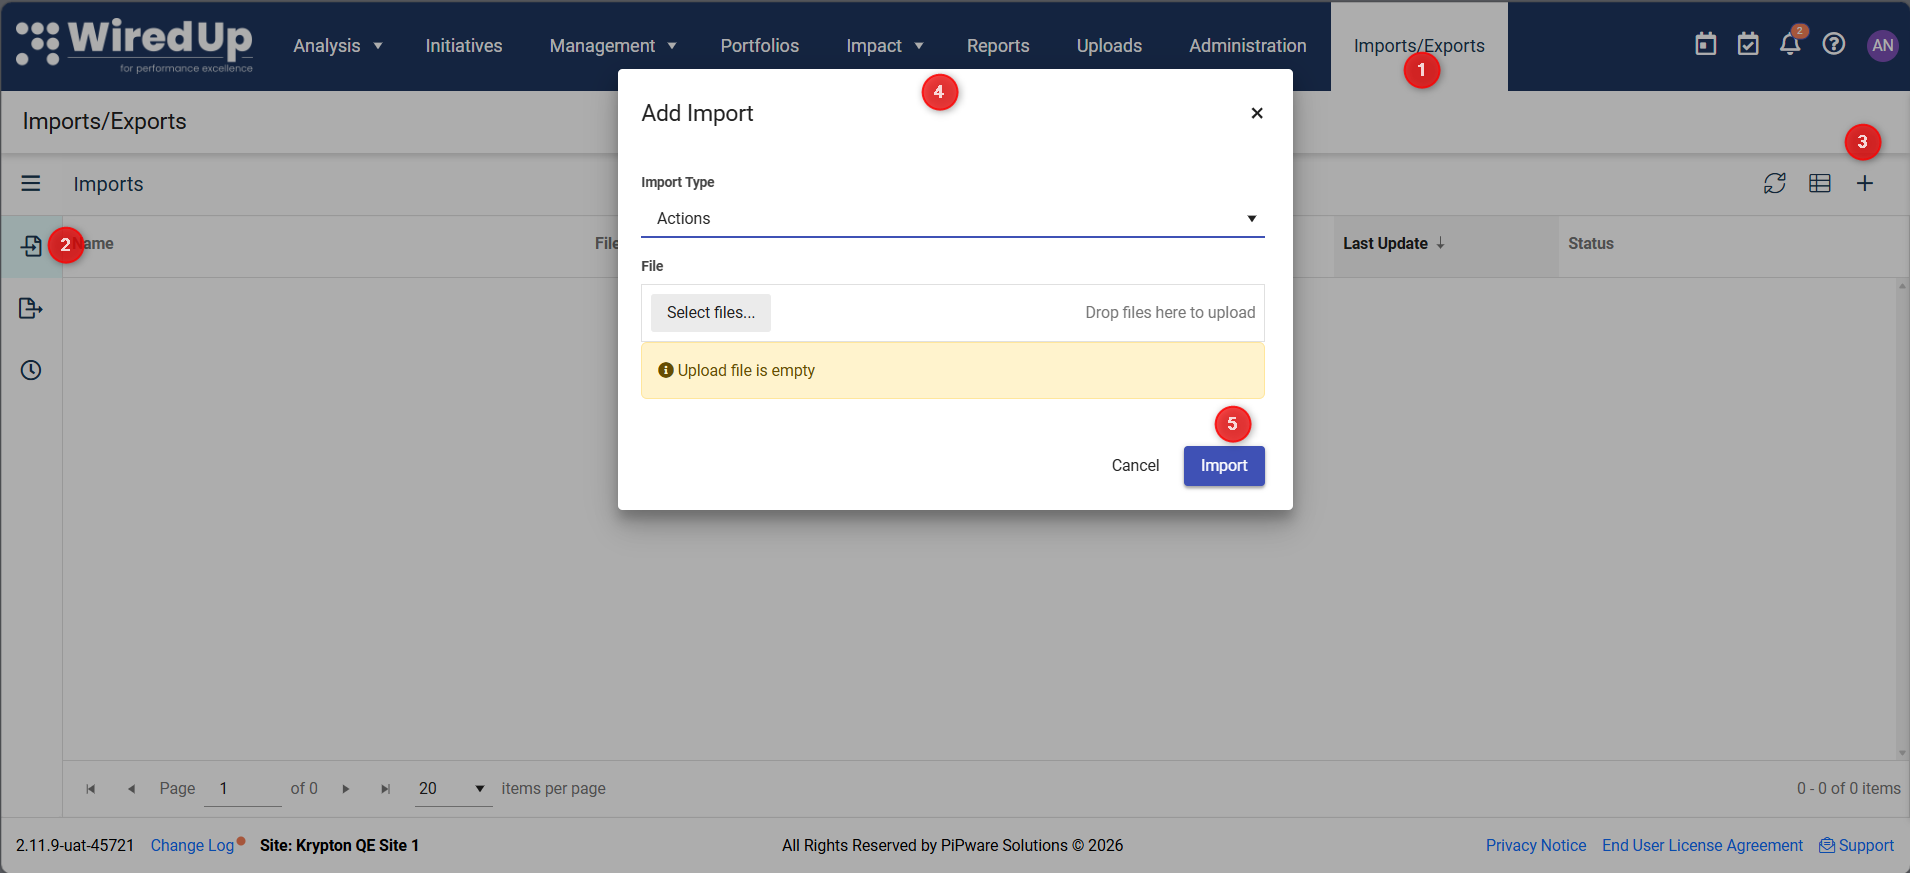
- Navigate to Imports/Exports from the top navigation menu
- Select Imports from the left-hand menu
- Click Add in the top-right corner of the page
- In the Add Import dialog:
- Select your Import Type from the dropdown menu (available options depend on your role permissions)
- Upload your import file by clicking Select files... to browse for the file
- Click Import to process the file
Note: If you attempt to import without selecting a file, you will see a warning message: "Upload file is empty."
Once submitted, your import will be processed and you can monitor its status in the Imports list, which displays the file name, date requested, last update, and current status.
Available Actions on the Imports Page
The Imports page includes the following options in the top-right corner:
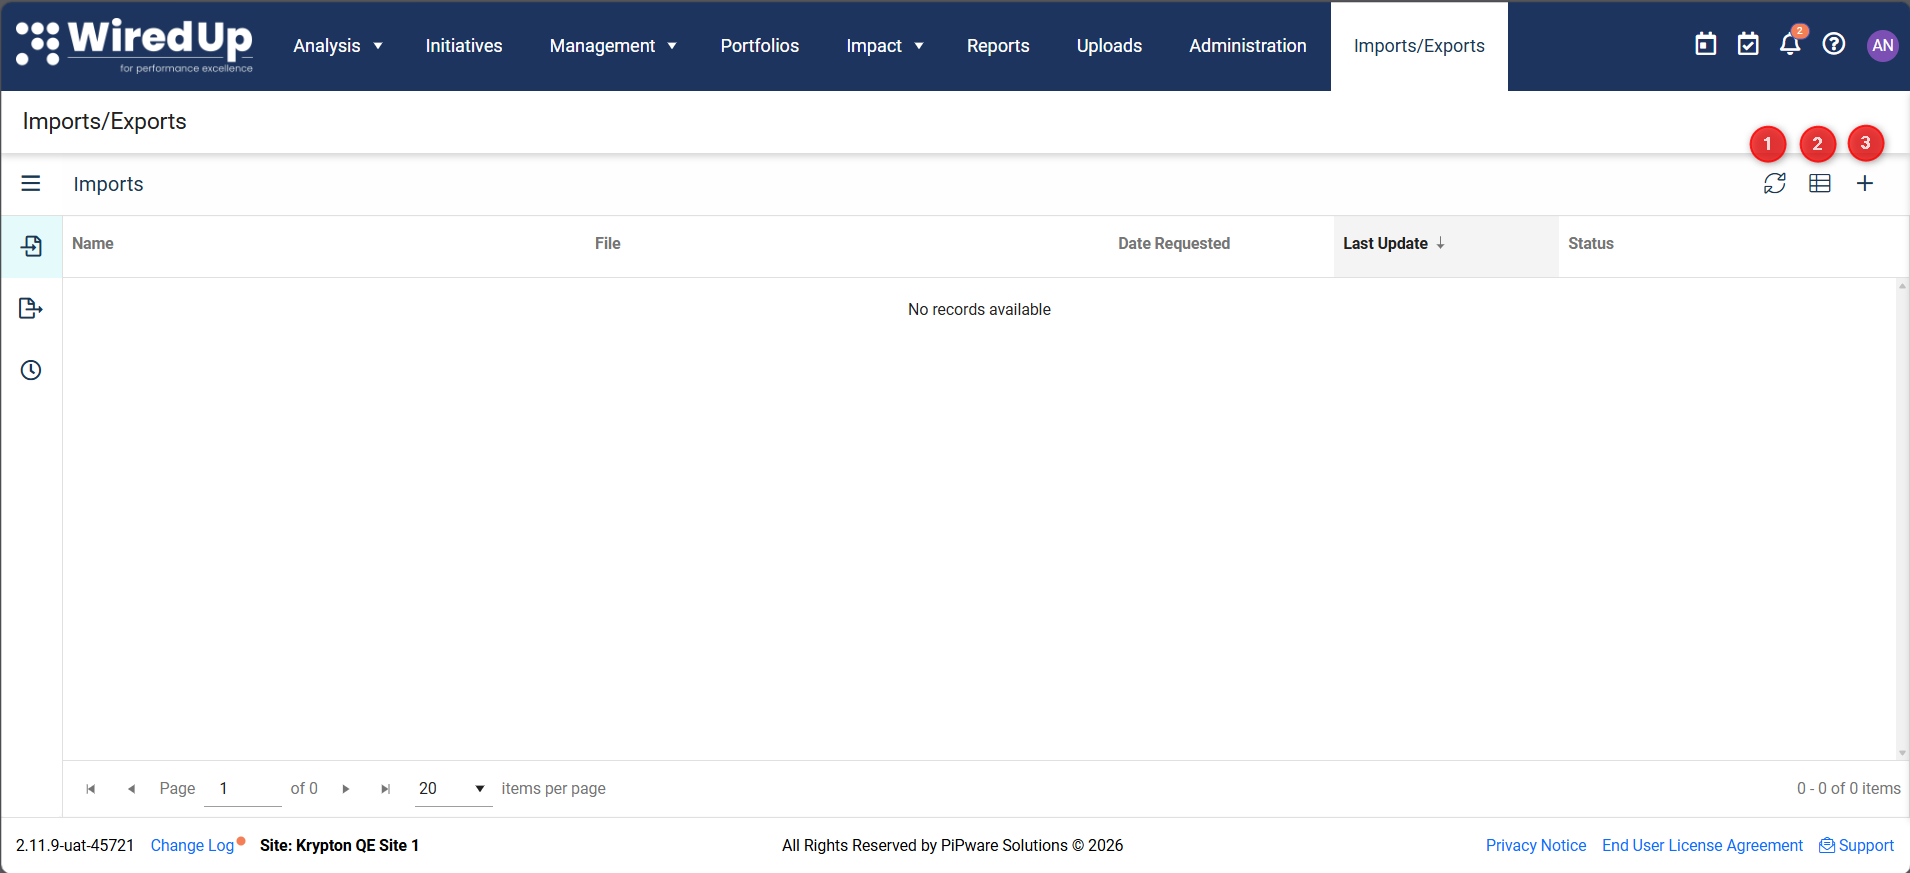
- Refresh - Refresh the imports list to see the latest status updates
- Templates - Access import templates for different import types
- Add - Add a new import
Add an Export
Exports allow you to extract data from WiredUp in a structured format for reporting, analysis, or record-keeping purposes. You can export various types of data and choose your preferred file format.
To create an export in WiredUp:
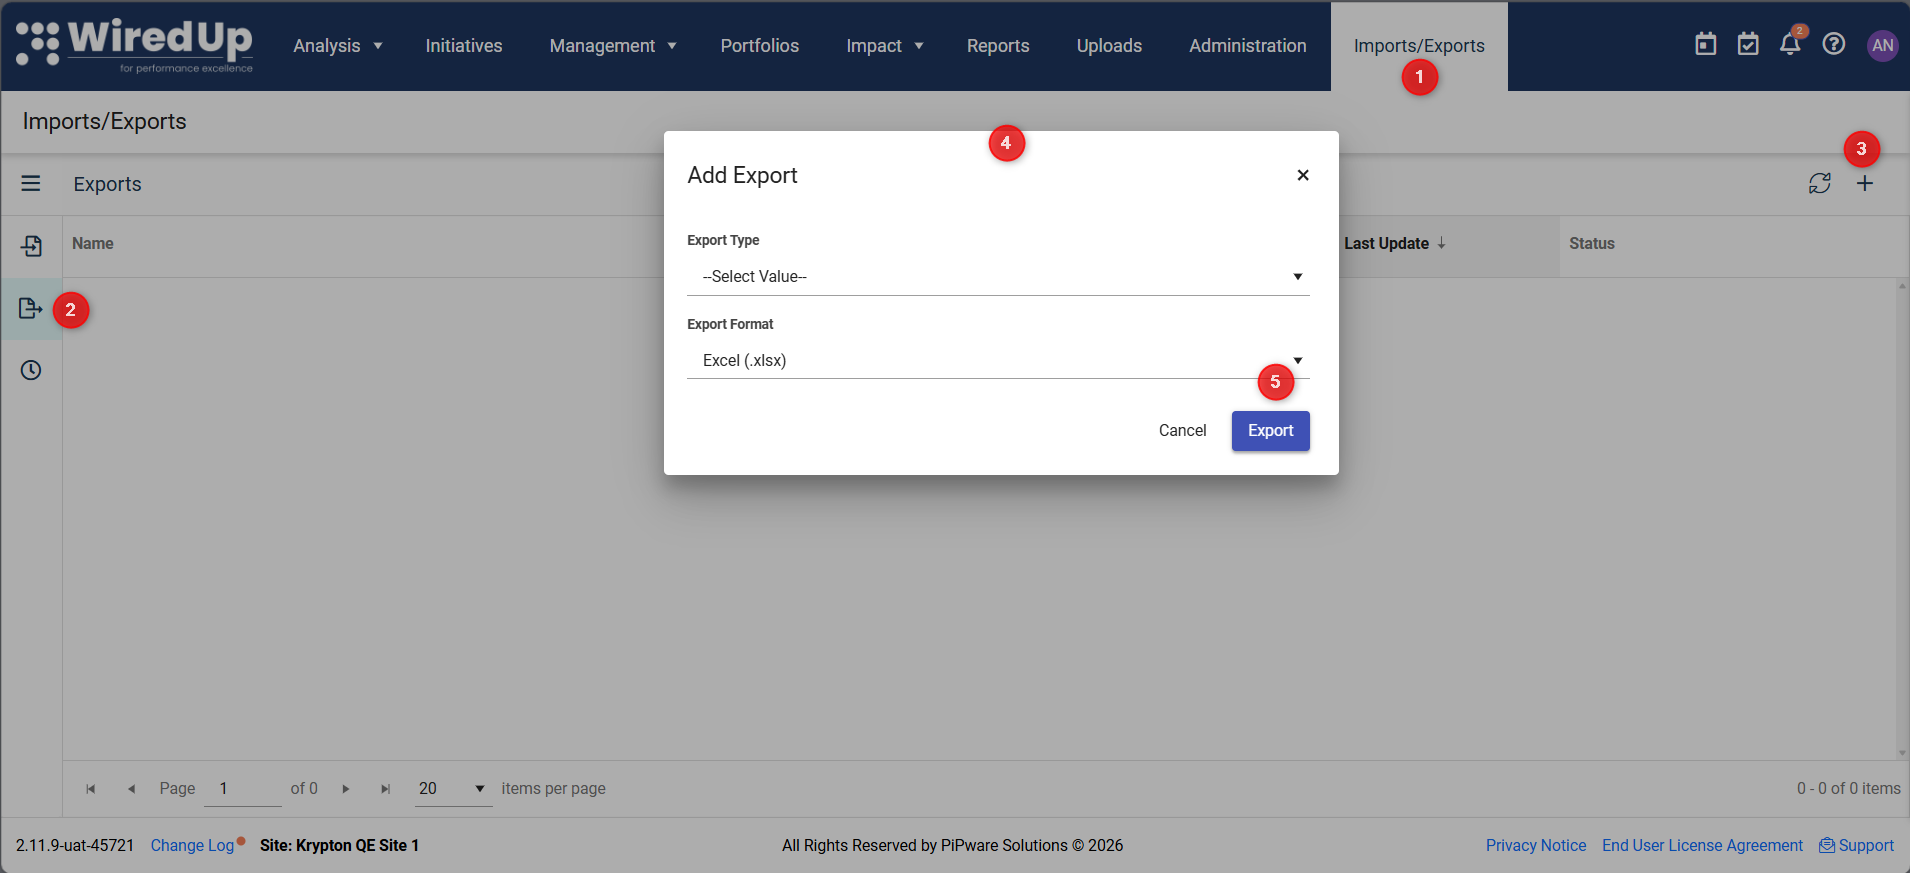
- Navigate to Imports/Exports from the top navigation menu
- Select Exports from the left-hand menu
- Click Add in the top-right corner of the page
- In the Add Exportdialog:
- Select your Export Type from the dropdown menu (available options depend on your role permissions)
- Choose your Export Format (e.g., Excel (.xlsx))
- Click Export to generate the file
Once the export is complete, it will appear in the Exports list with a status of "Complete" and a timestamp showing when it was last updated. You can then download the exported file for your use.
Available Actions on the Exports Page
The Exports page includes the following options in the top-right corner:
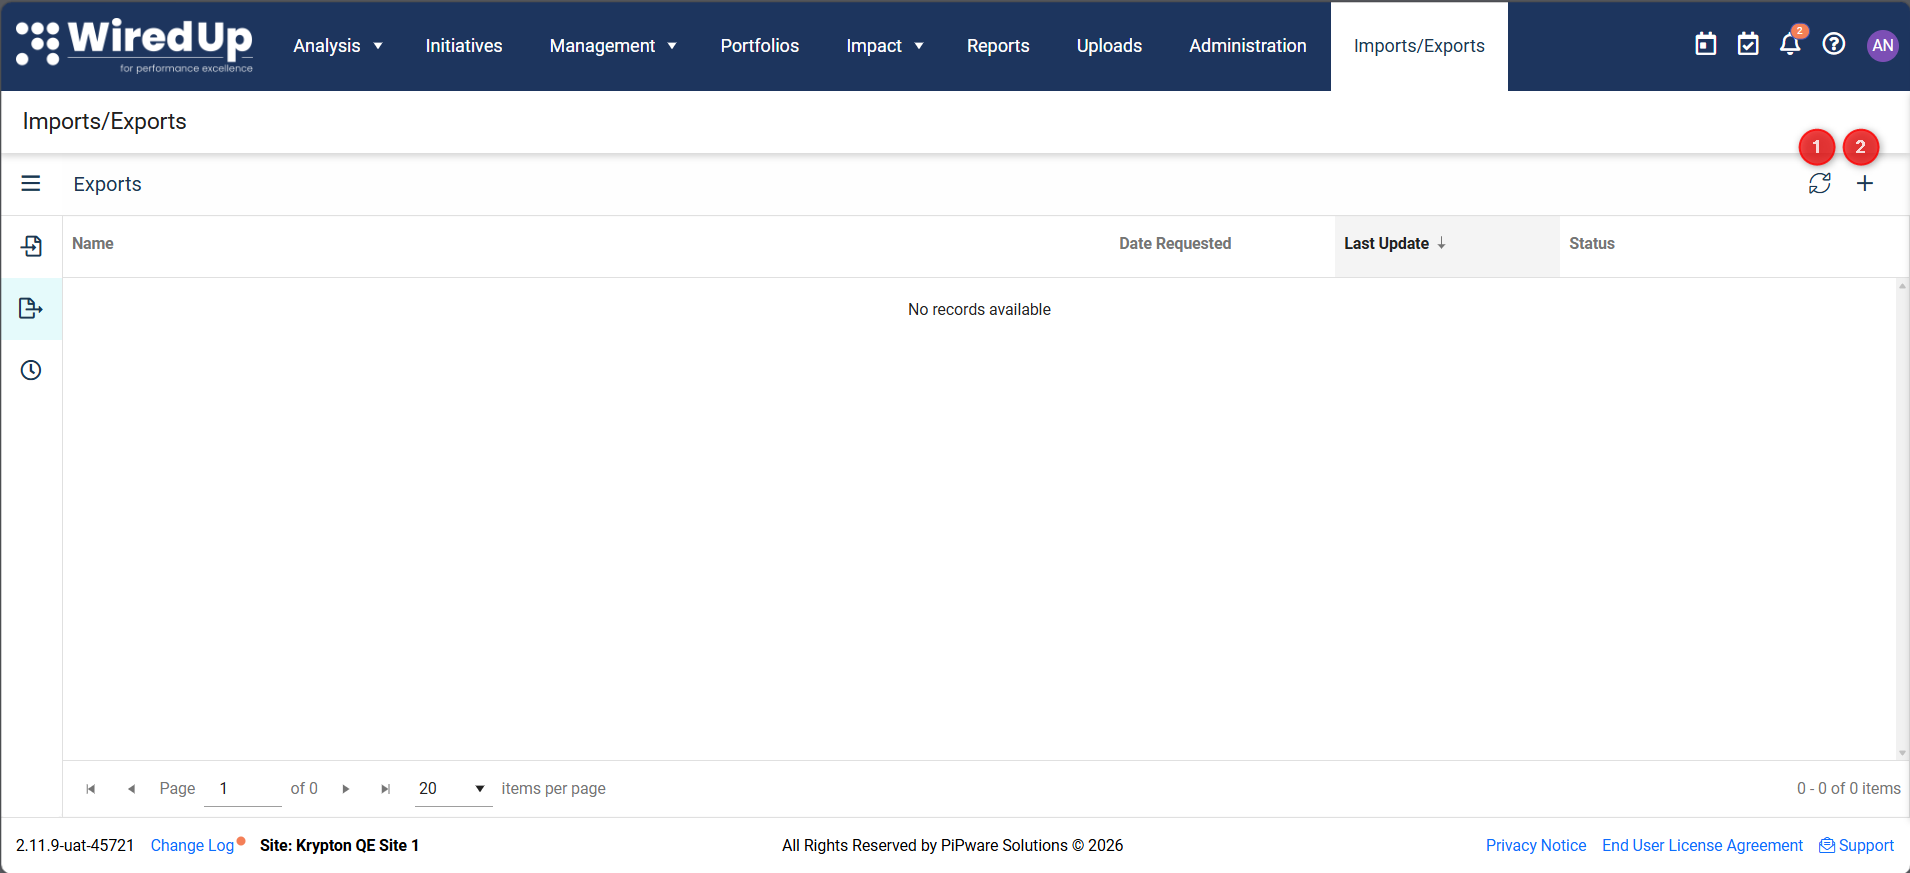
- Refresh - Refresh the exports list to see the latest status updates
- Add - Add a new export
Add a Scheduled Export
Scheduled Exports enable you to automate the export process by setting up recurring exports that are automatically generated and sent to specified email addresses. This is ideal for regular reporting requirements or when stakeholders need consistent data updates without manual intervention.
To schedule recurring exports:
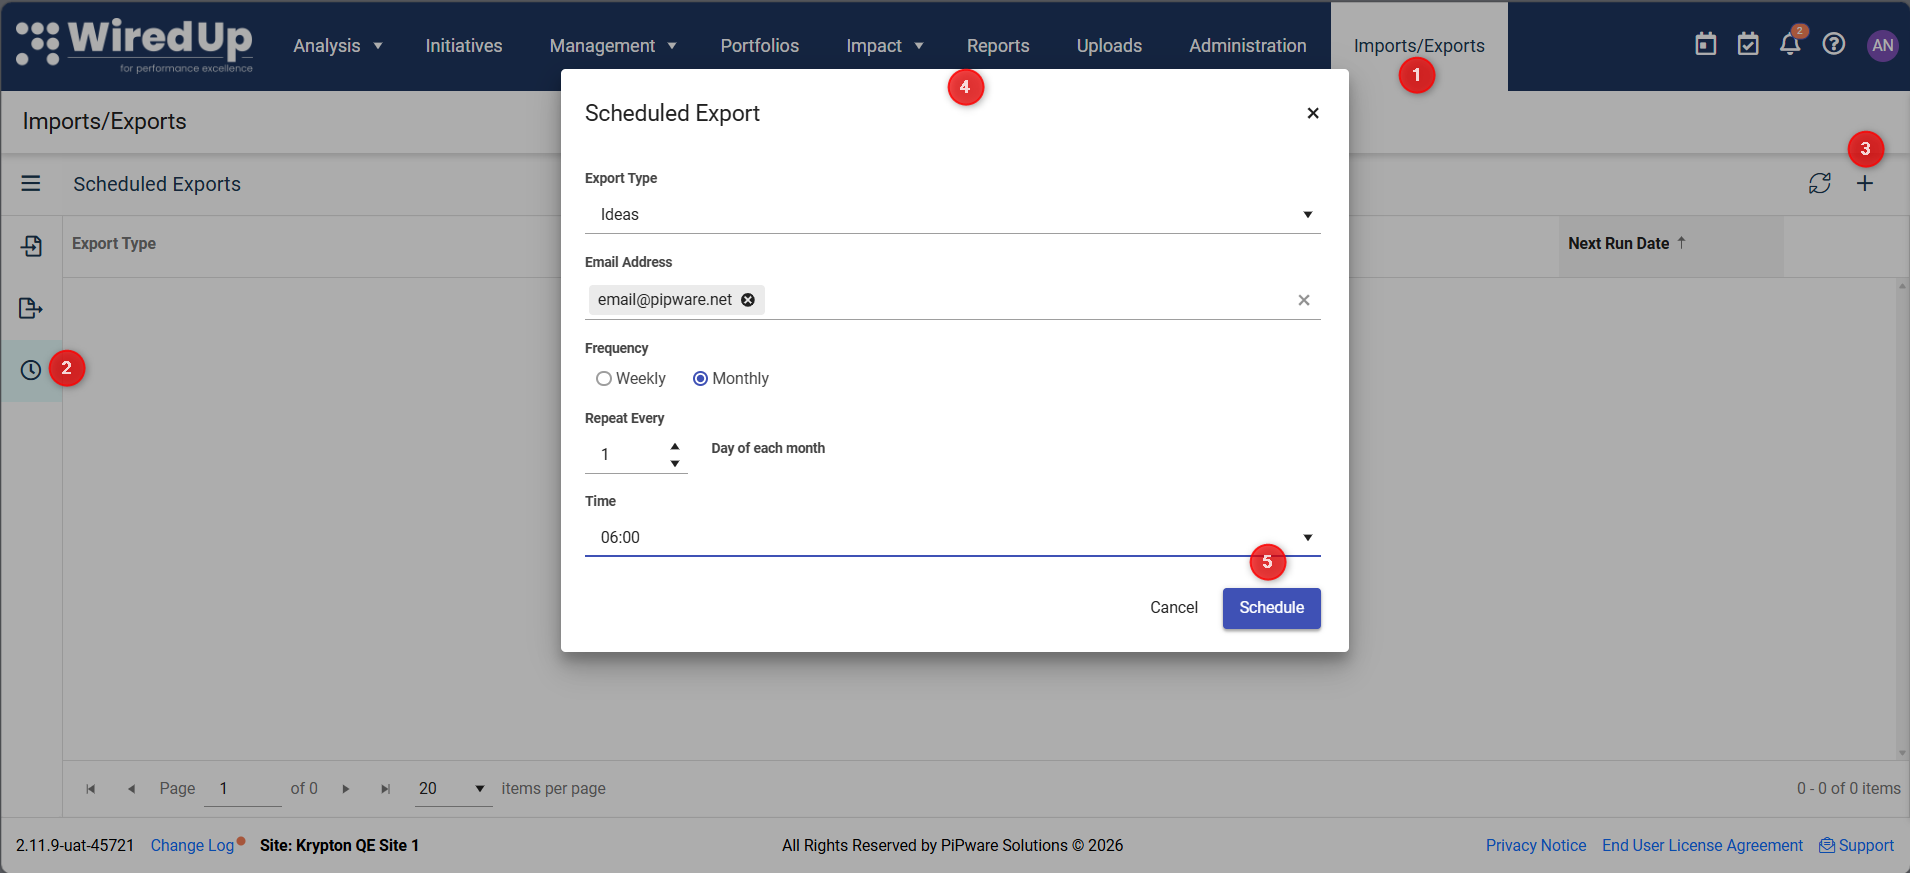
- Navigate to Imports/Exports from the top navigation menu
- Select Scheduled Exports from the left-hand menu
- Click Add in the top-right corner of the page
- In the Scheduled Export dialog, configure the following:
- Export Type - Select the type of data you want to export (available options depend on your role permissions)
- Email Address - Enter the email address(es) where the export should be sent. You can add multiple recipients if needed.
- Frequency- Choose how often the export should run:
- Weekly, or
- Monthly
- Time - Select the specific time when the export should run
- Click Schedule to save the scheduled export
The scheduled export will run automatically at the specified frequency and time, generating the export file and sending it to the designated email address(es). You can view all your scheduled exports in the Scheduled Exports list, which displays the export type and the next scheduled run date.
Available Actions on the Scheduled Exports Page
The Scheduled Exports page includes the following options in the top-right corner:
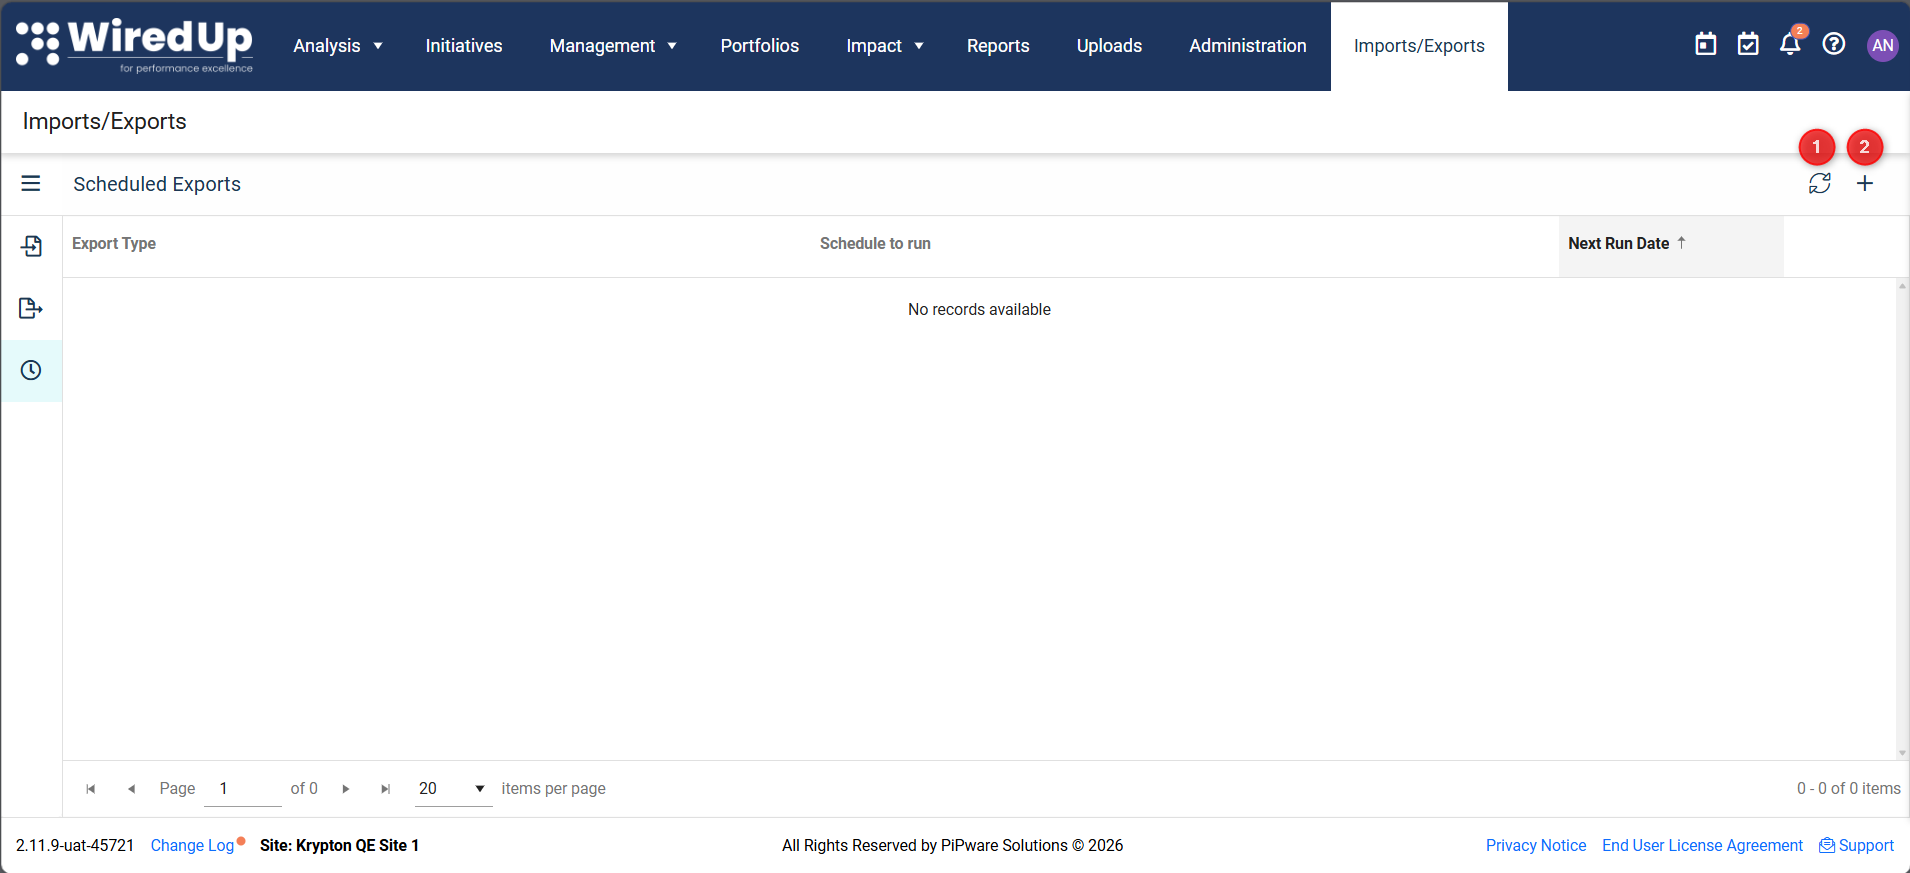
- Refresh - Refresh the scheduled exports list to see the latest information
- Add - Add a new scheduled export
Role Permissions
Access to import and export functionality is controlled by role permissions. System administrators can configure which users have access to specific import and export types by:
- Navigating to Administration > Roles
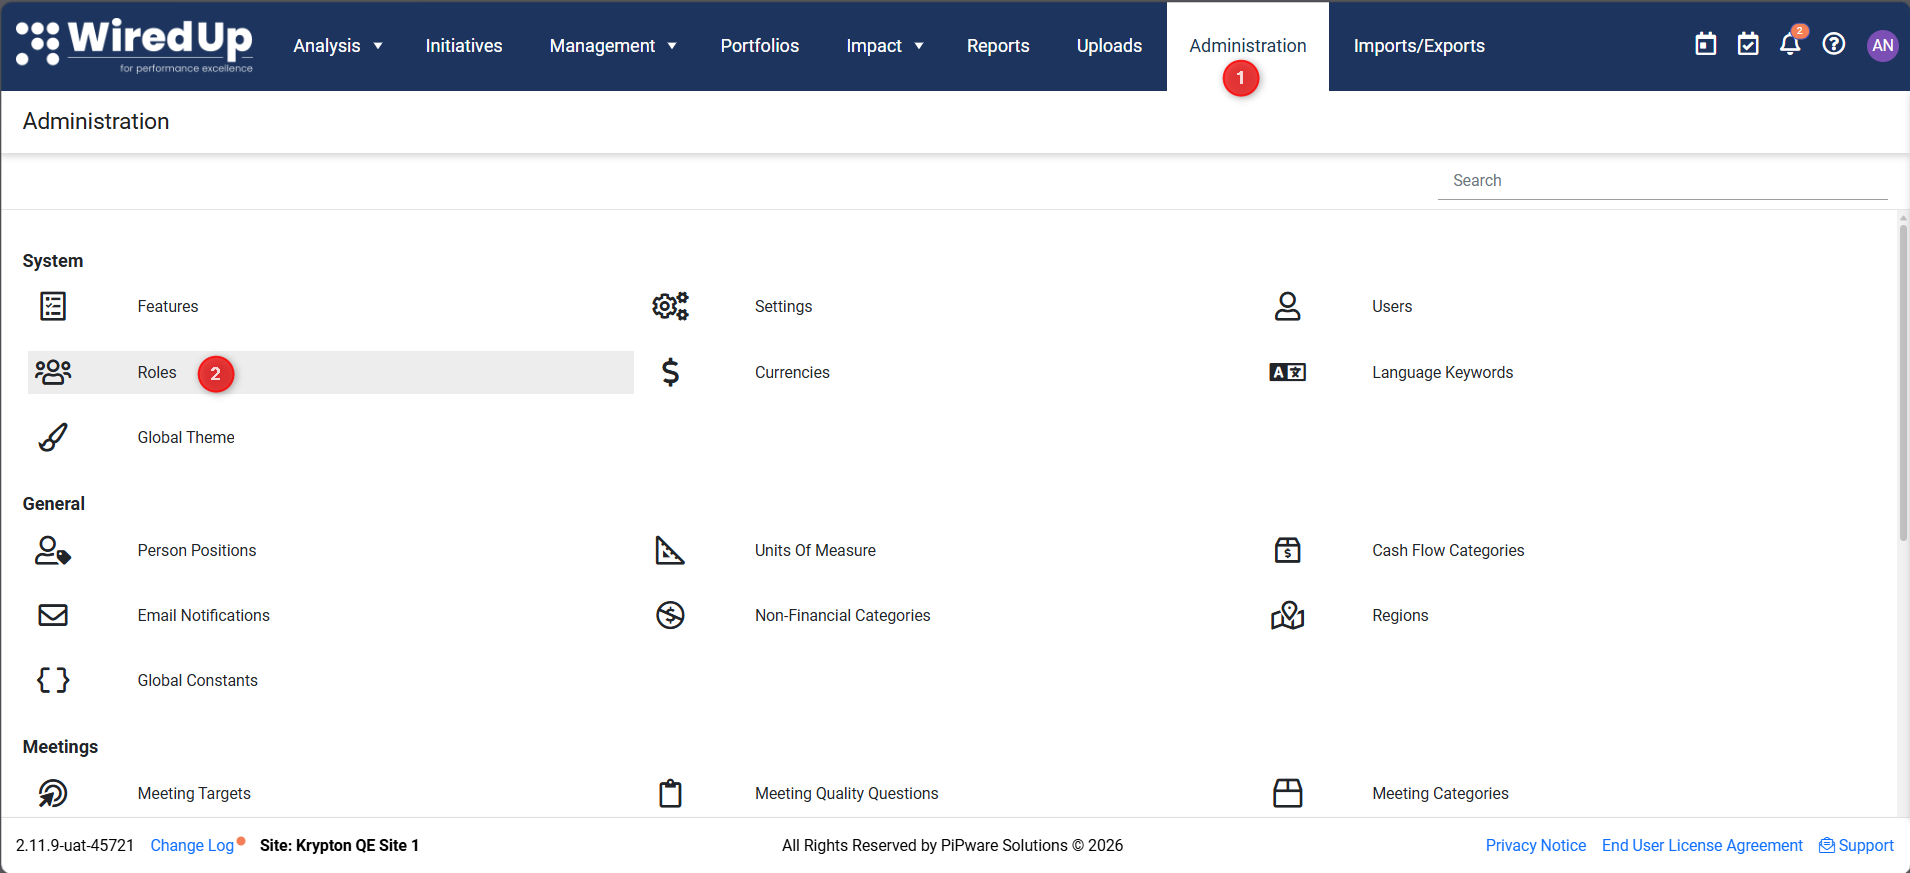
- Selecting the role to edit
- Enabling or disabling permissions for:
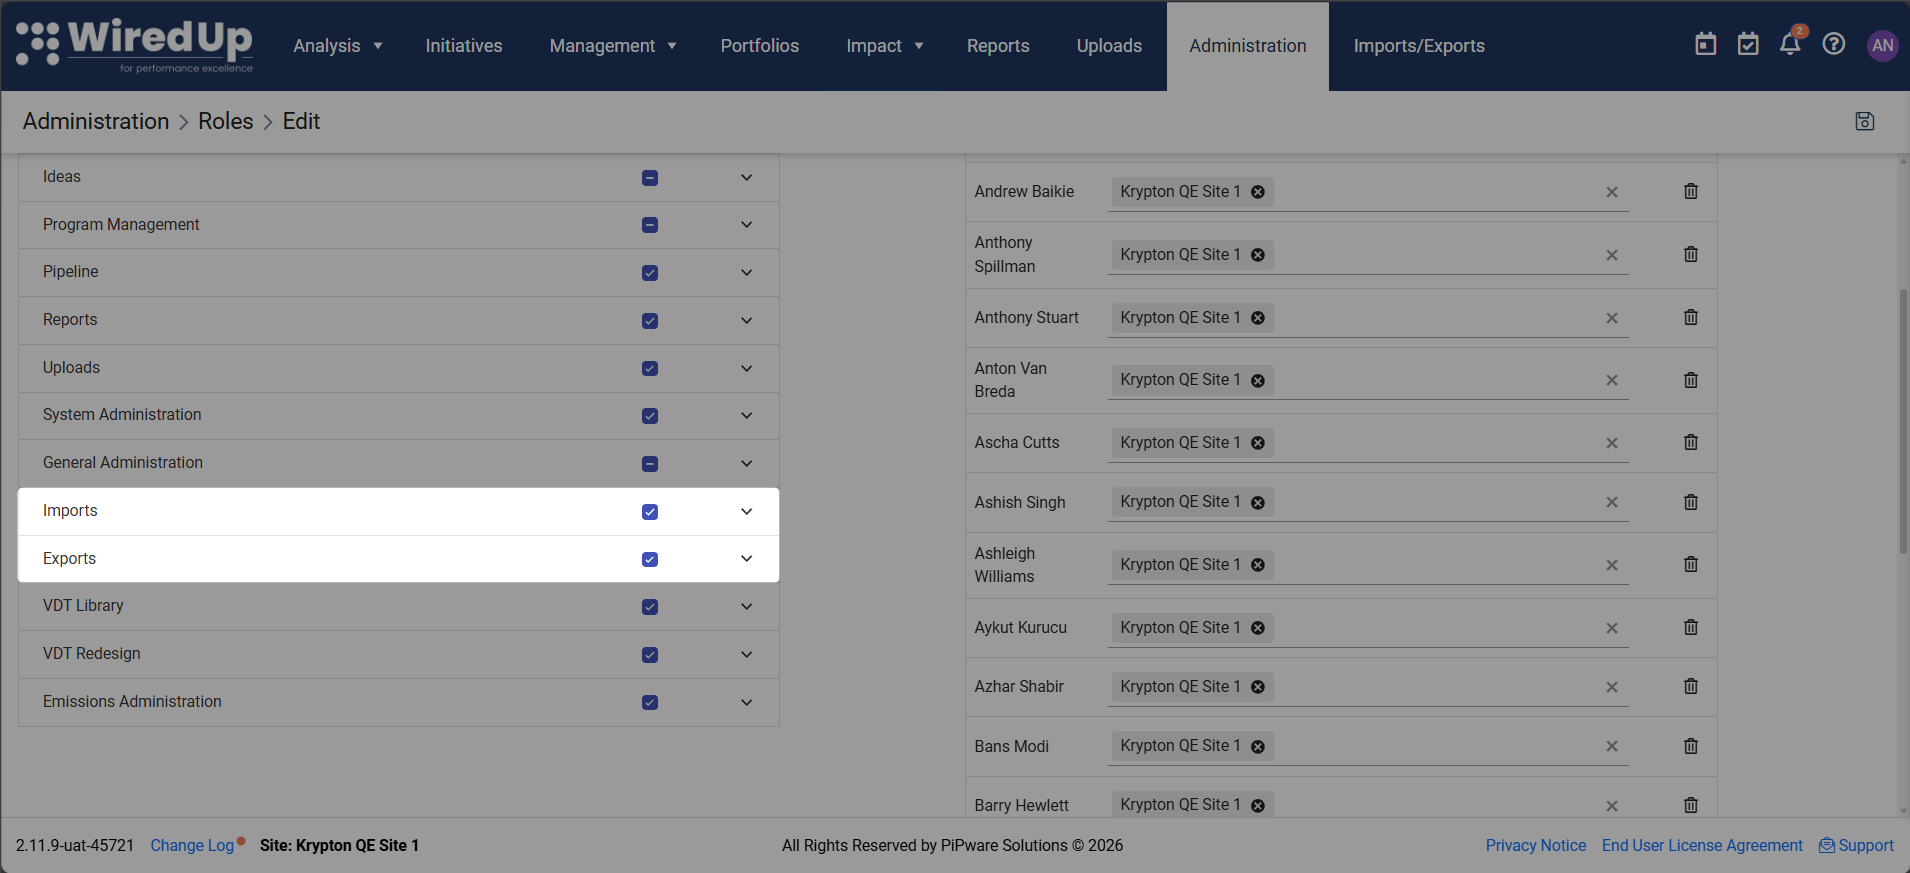
- Imports - Controls access to the Imports functionality
- Exports - Controls access to the Exports functionality
Users will only see the import and export types they have been granted permission to access.
Best Practices
To ensure successful imports and exports, follow these best practices:
For Imports:
- Always use the correct template for your import type to avoid formatting errors
- Validate your data before importing to ensure all required fields are populated
- Check the import status after submission to confirm successful processing
For Exports:
- Select the appropriate date range to ensure you're exporting the data you need
- Choose the right export format based on how you plan to use the data
- Use Scheduled Exports for recurring reporting needs to save time and ensure consistency
For Scheduled Exports:
- Double-check email addresses before scheduling to ensure reports reach the intended recipients
- Set appropriate frequencies that align with reporting requirements without overwhelming recipients
- Choose optimal timing for scheduled exports to avoid system peak hours when possible
- Review scheduled exports regularly to ensure they're still needed and going to the correct recipients
Related Articles
Import/Export Templates : WiredUp