In This Article
Overview
Capturing a meeting in WiredUp allows you to record the details, discussions, decisions, and outcomes of each meeting instance. This feature ensures that all important information is documented, actions are tracked, and participants are held accountable for their commitments.
When you capture a meeting, you can:
- Record meeting attendance and participant roles
- Document process items and discussions for each agenda item
- Create and assign action items with due dates and responsible parties
- Track KPIs and review their performance against targets
- Evaluate ideas/initiatives and make decisions on their implementation
- Answer meeting quality questions to assess meeting effectiveness
- Review actions and outcomes from previous meetings
- Mark the meeting as complete or cancelled
Capturing meetings ensures continuity between meeting instances, helps teams stay aligned on priorities, and provides a historical record of decisions and progress. All captured information is saved and can be referenced in future meetings or reports.
Accessing Capture Meeting
You can capture a meeting from multiple locations within the Meetings module:
From Schedule View or Card View: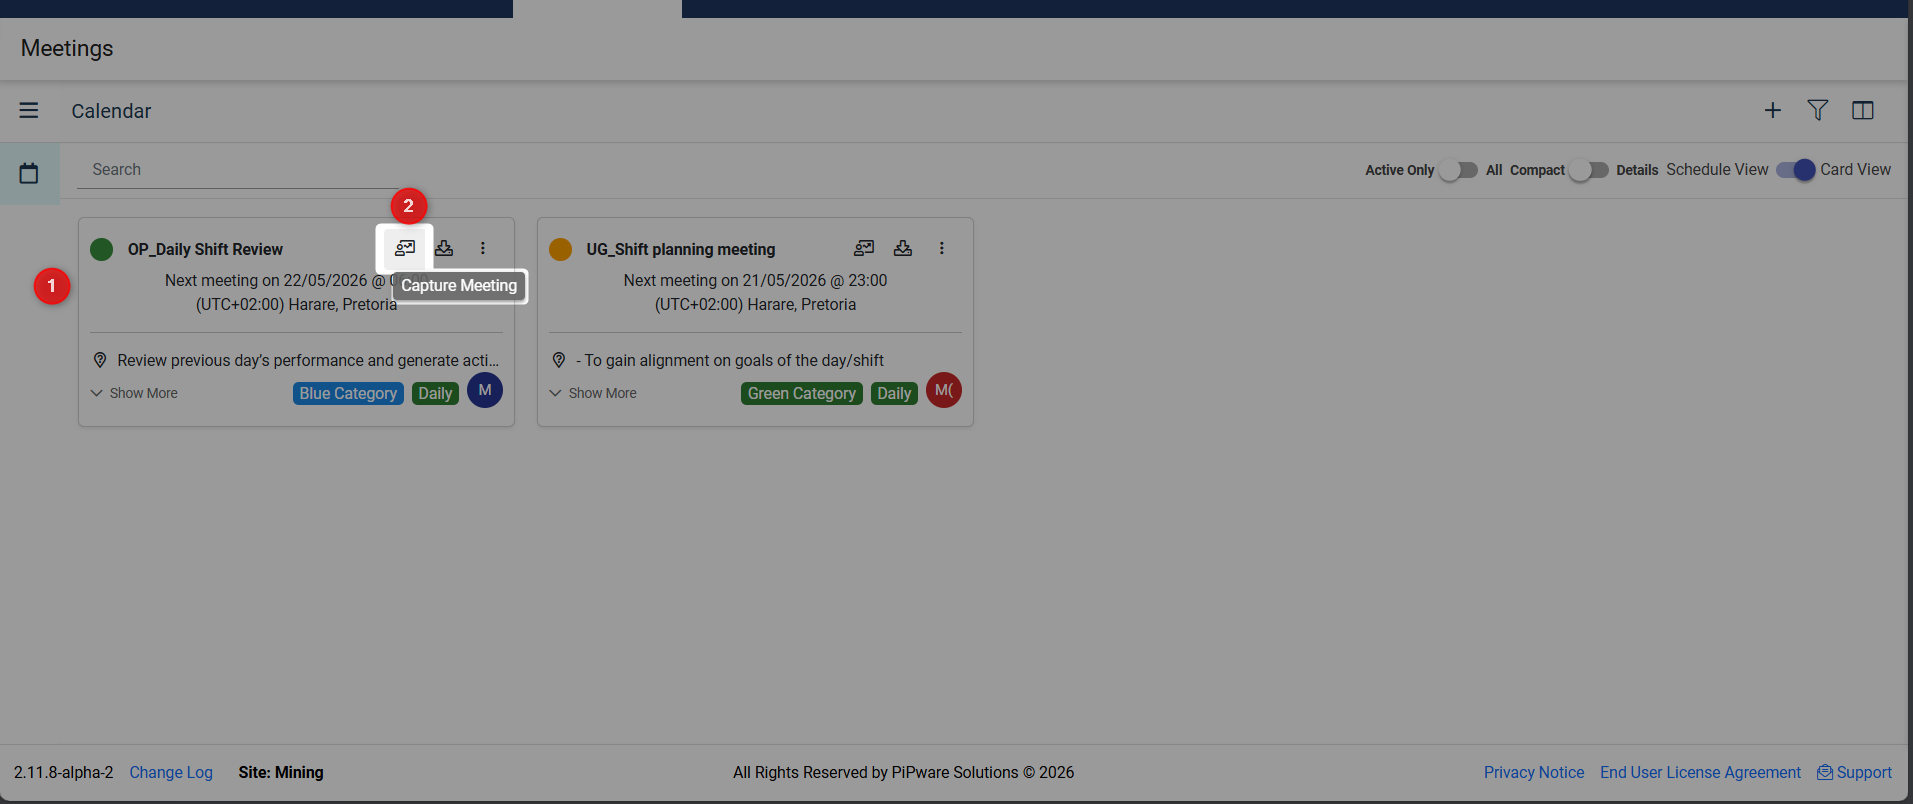
- Click on any meeting instance
- Select the Capture Meeting icon
This works across all Schedule view options (Agenda, Day, Week, Month) and Card view.
Capture Meeting Screen
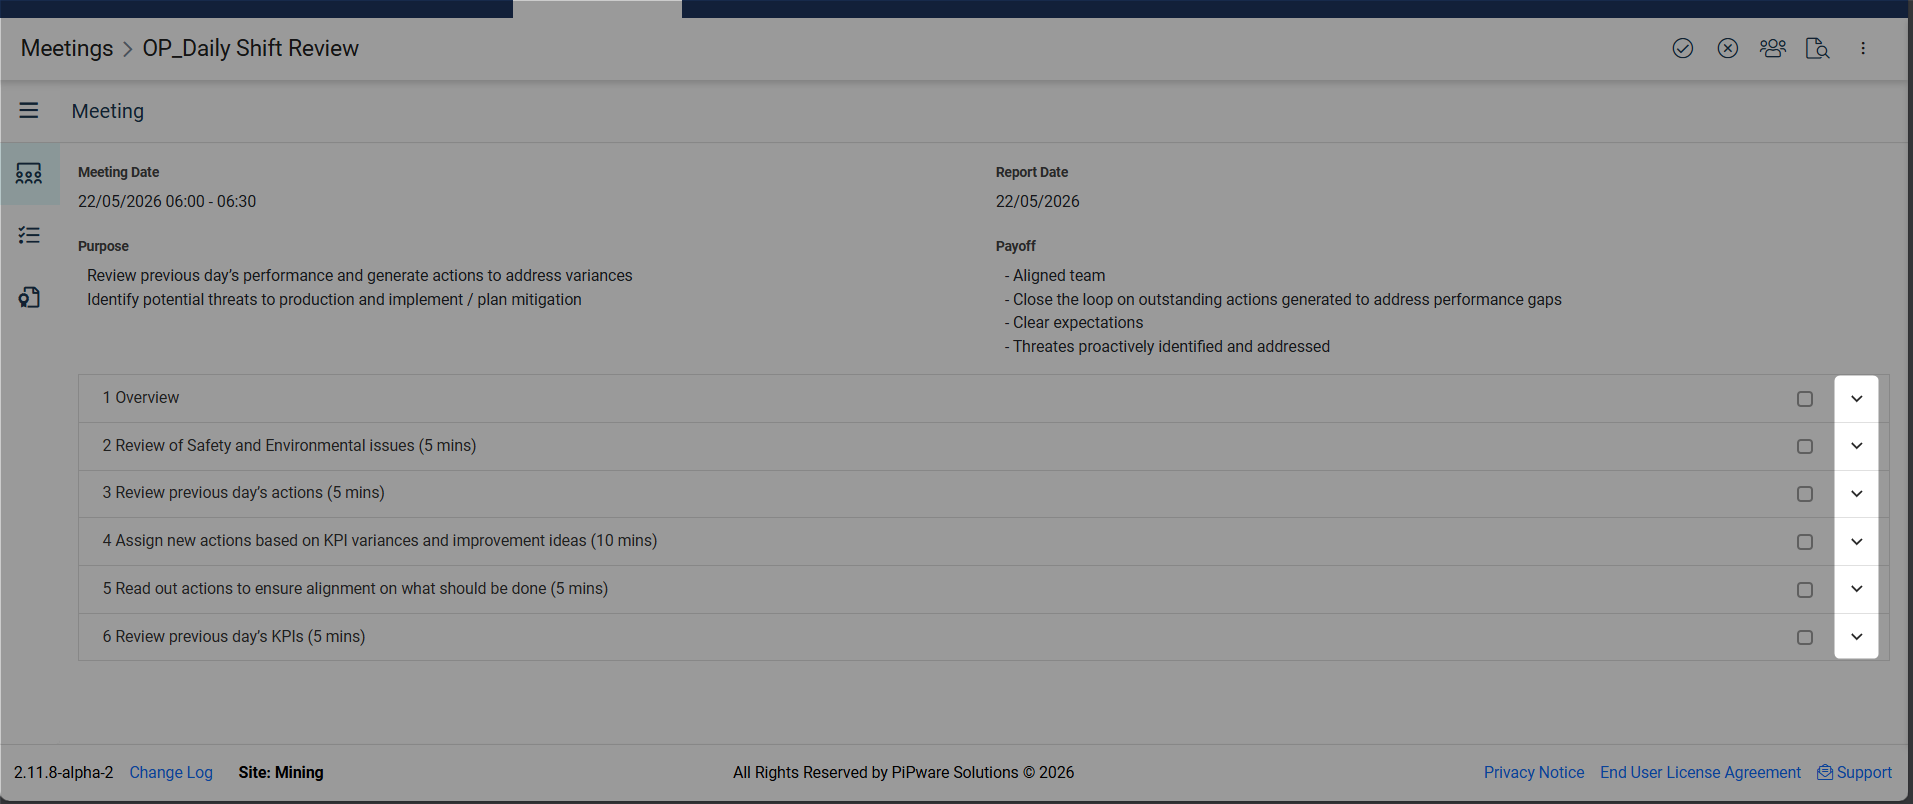
Upon clicking the Capture Meeting icon, the Meeting capture screen will be displayed with the following information:
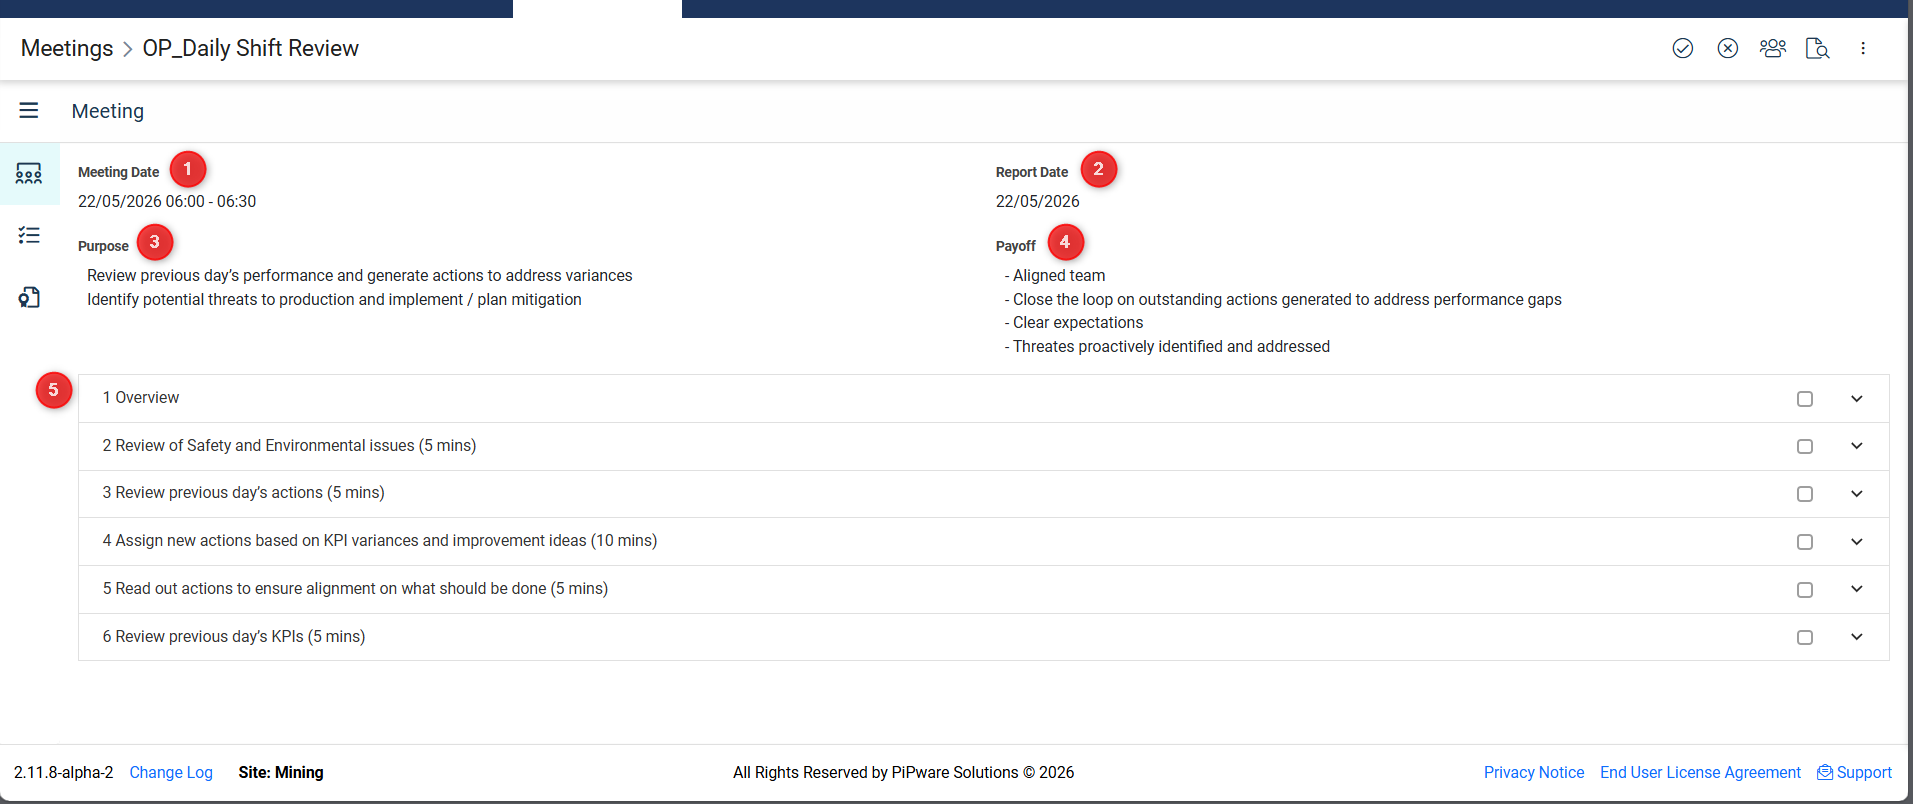
1. Meeting Date
- Shows the date and time of the current meeting instance
- Format: DD/MM/YYYY HH:MM - HH:MM
- This represents when the meeting is scheduled to take place
2. Report Date
- Displays the report date used for evaluating KPIs and reports
- Calculated based on the reporting days setting from the meeting series (Report Date = Meeting Date - Reporting Days)
- This determines the data period for KPIs and reports reviewed in the meeting
3. Purpose
- Displays the purpose of the meeting as defined in the meeting series
- Explains why the meeting is being held and what it aims to accomplish
4. Payoff
- Shows the expected outcomes and benefits of the meeting
- Lists the key results the meeting should achieve
5. Process Items
- Lists all process items (agenda items) that were specified when the meeting was created
- Each process item shows:
- Process number (if specified) and name
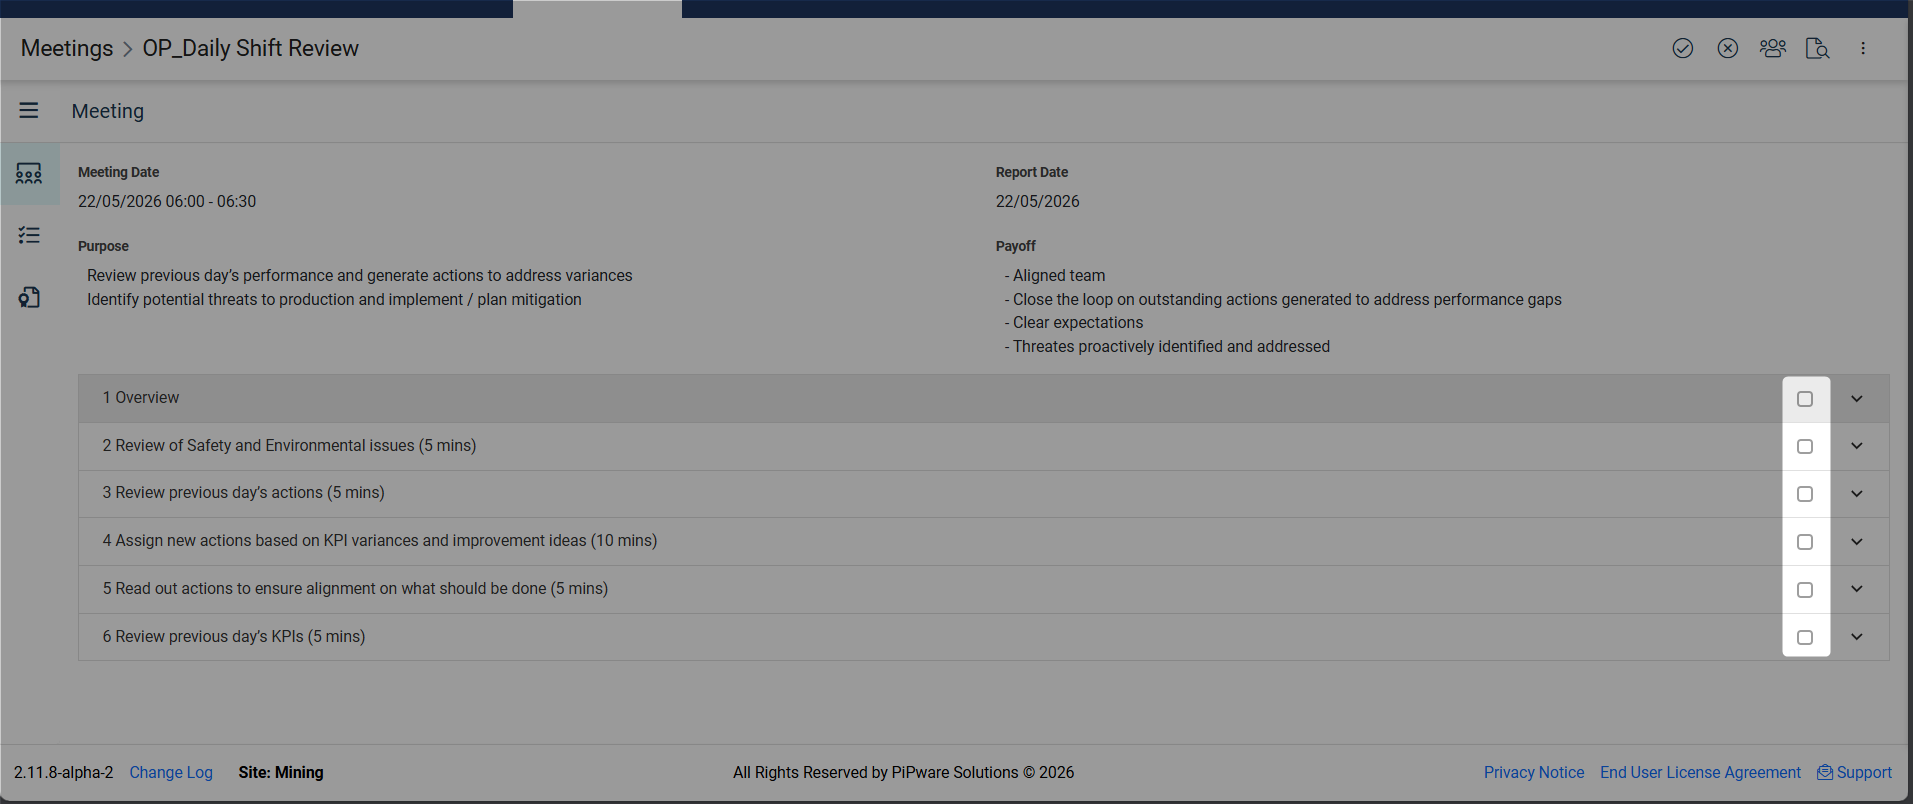
- Checkbox to mark the process as complete
- Dropdown arrow to expand and capture details for that process
Capture Meeting Toolbar
At the top-right side of the screen, the following icons are displayed: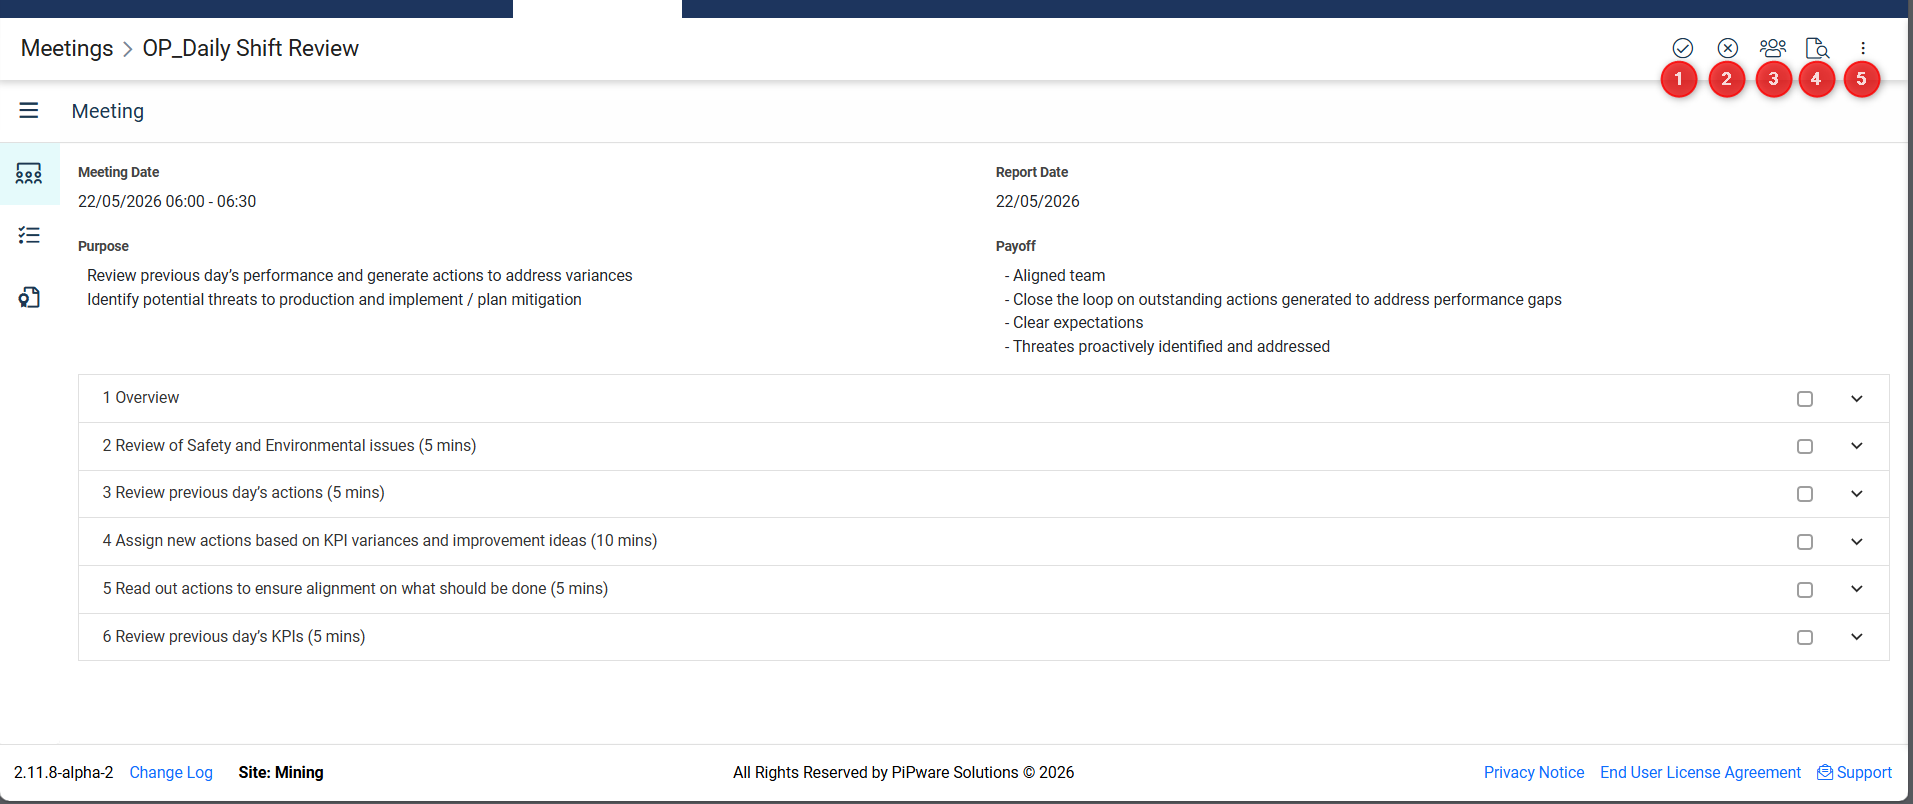
1. Complete Icon (Checkmark)
- Click to update the status of the meeting to Complete
- Marks the meeting instance as finished
- Typically used after all agenda items have been covered and actions recorded
2. Cancel Icon (X)
- Click to update the status of the meeting to Cancelled
- Use when a meeting instance is cancelled and will not take place
- Cancelled meetings are tracked separately from completed meetings
3. Participants Icon (People)
- Click to show the Participants pane
- Displays all participants invited to the meeting
- Allows you to:
- Record attendance (mark who attended and who was absent)
- Change participant roles if needed
- View participant contact information
4. Audit Icon (Clock/History)
- Click to view the audit log of changes made to meeting actions
- Shows a history of all modifications to actions captured during the meeting including:
- Who made the change
- What was changed
- When the change was made
5. Three-Dot Menu (More Options)
- Click to access additional meeting options
- Options include:
- Email: Send meeting details to participants via email
- Download: Export meeting details as a PDF
Meeting Tab
The Meeting tab is the default view that appears when you click on Capture Meeting.
Process Items
Here, you can capture the details for each process item that was specified when the meeting was created. Each process item in the meeting can be expanded to capture detailed information:
1. Marking a Process as Complete
To mark a process as complete:
- Locate the process item in the list
- Click the checkbox next to the process name
- The process will be marked as complete for this meeting instance
2. Expanding a Process
To capture details for a process:
- Click the dropdown arrow on the right side of the process item
- The process will expand to show all configured sections
3. Process Sections
Depending on how the process was configured in the meeting definition, you may see the following sections:
- Overview
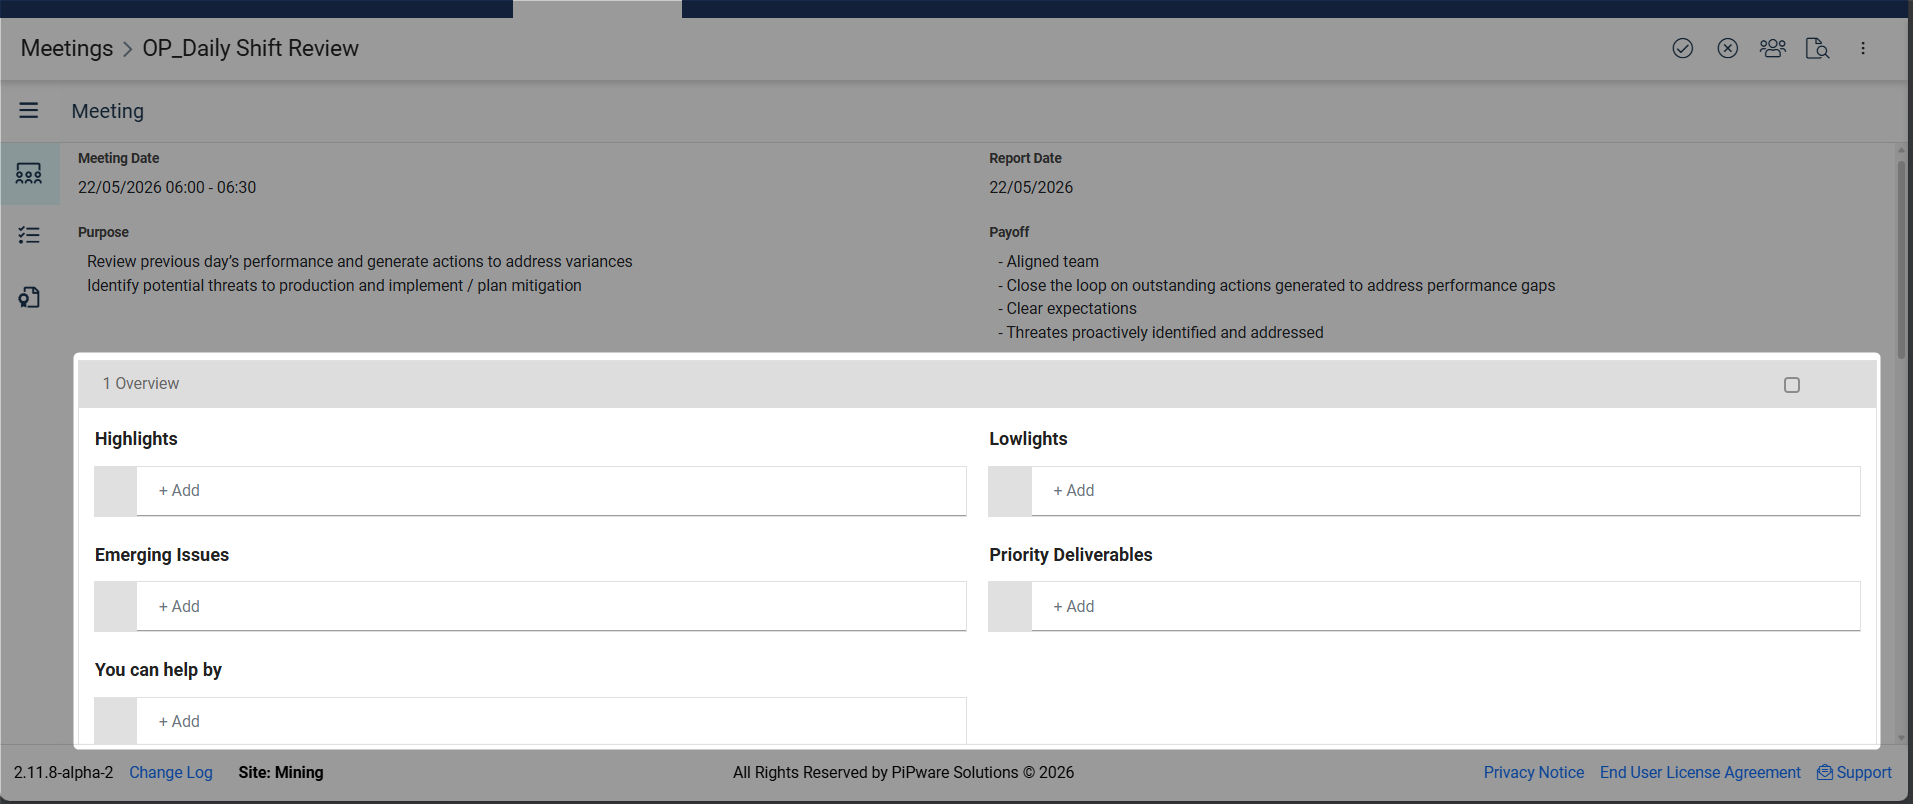
- Capture notes, observations, and discussion points
- Use rich text formatting to structure your notes
- If "Roll Forward Overview Items" is enabled, content from the previous meeting will be pre-populated
- Key Performance Indicators (KPIs)
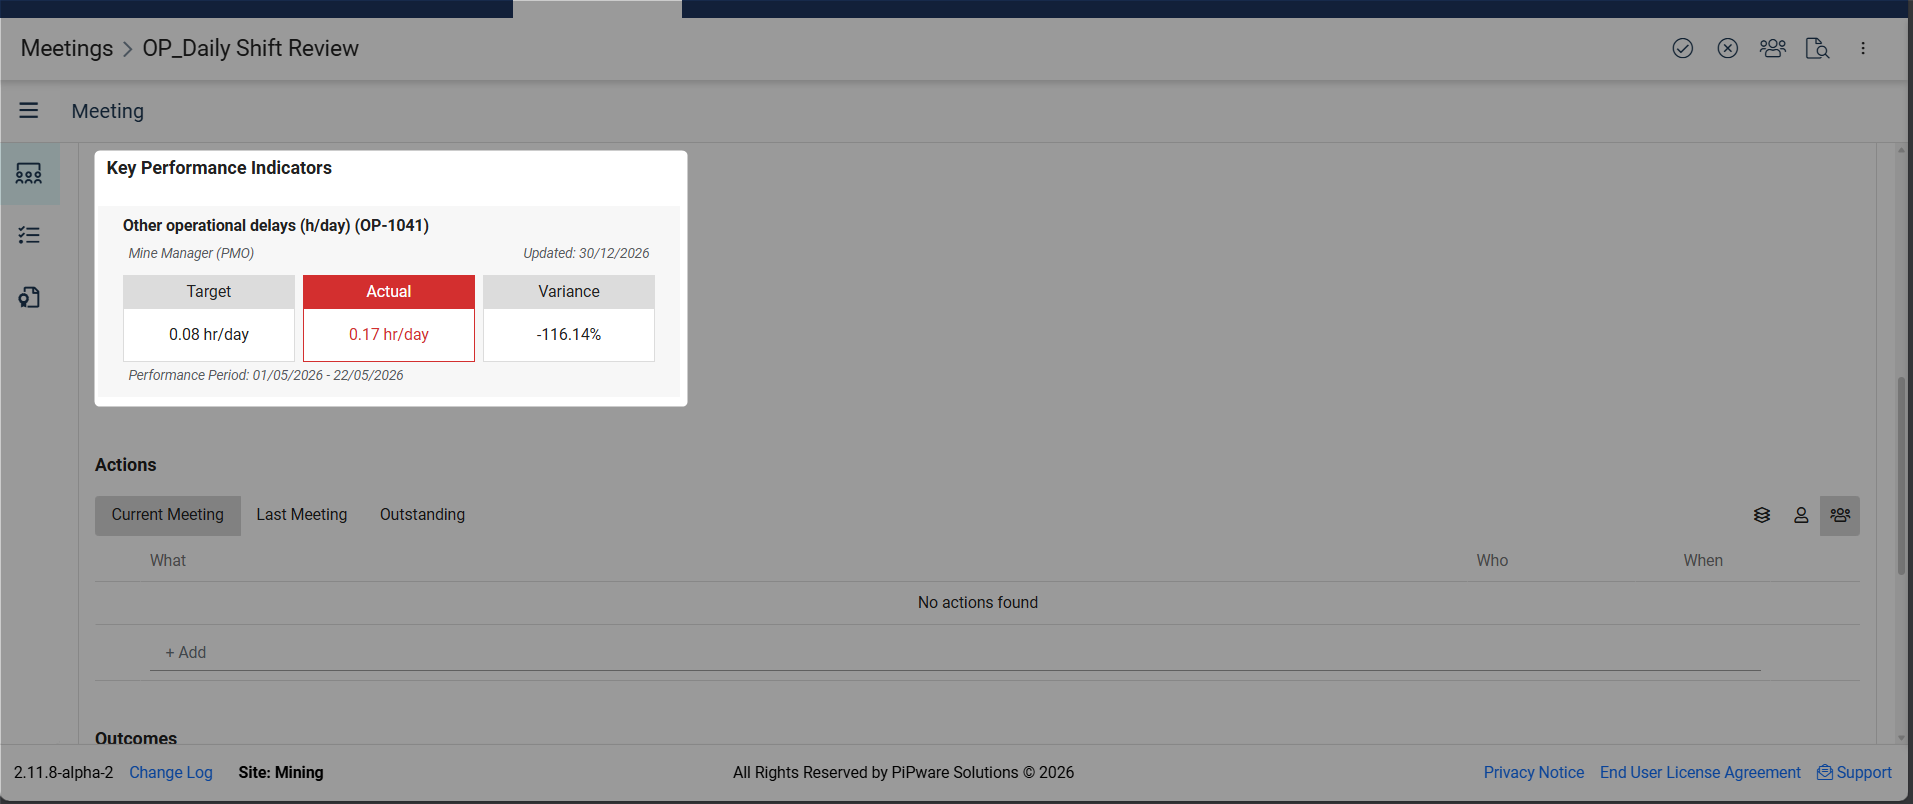
- Review KPIs associated with this process
- View KPI performance against targets
- When you click on a KPI, a KPI chart is displayed showing:
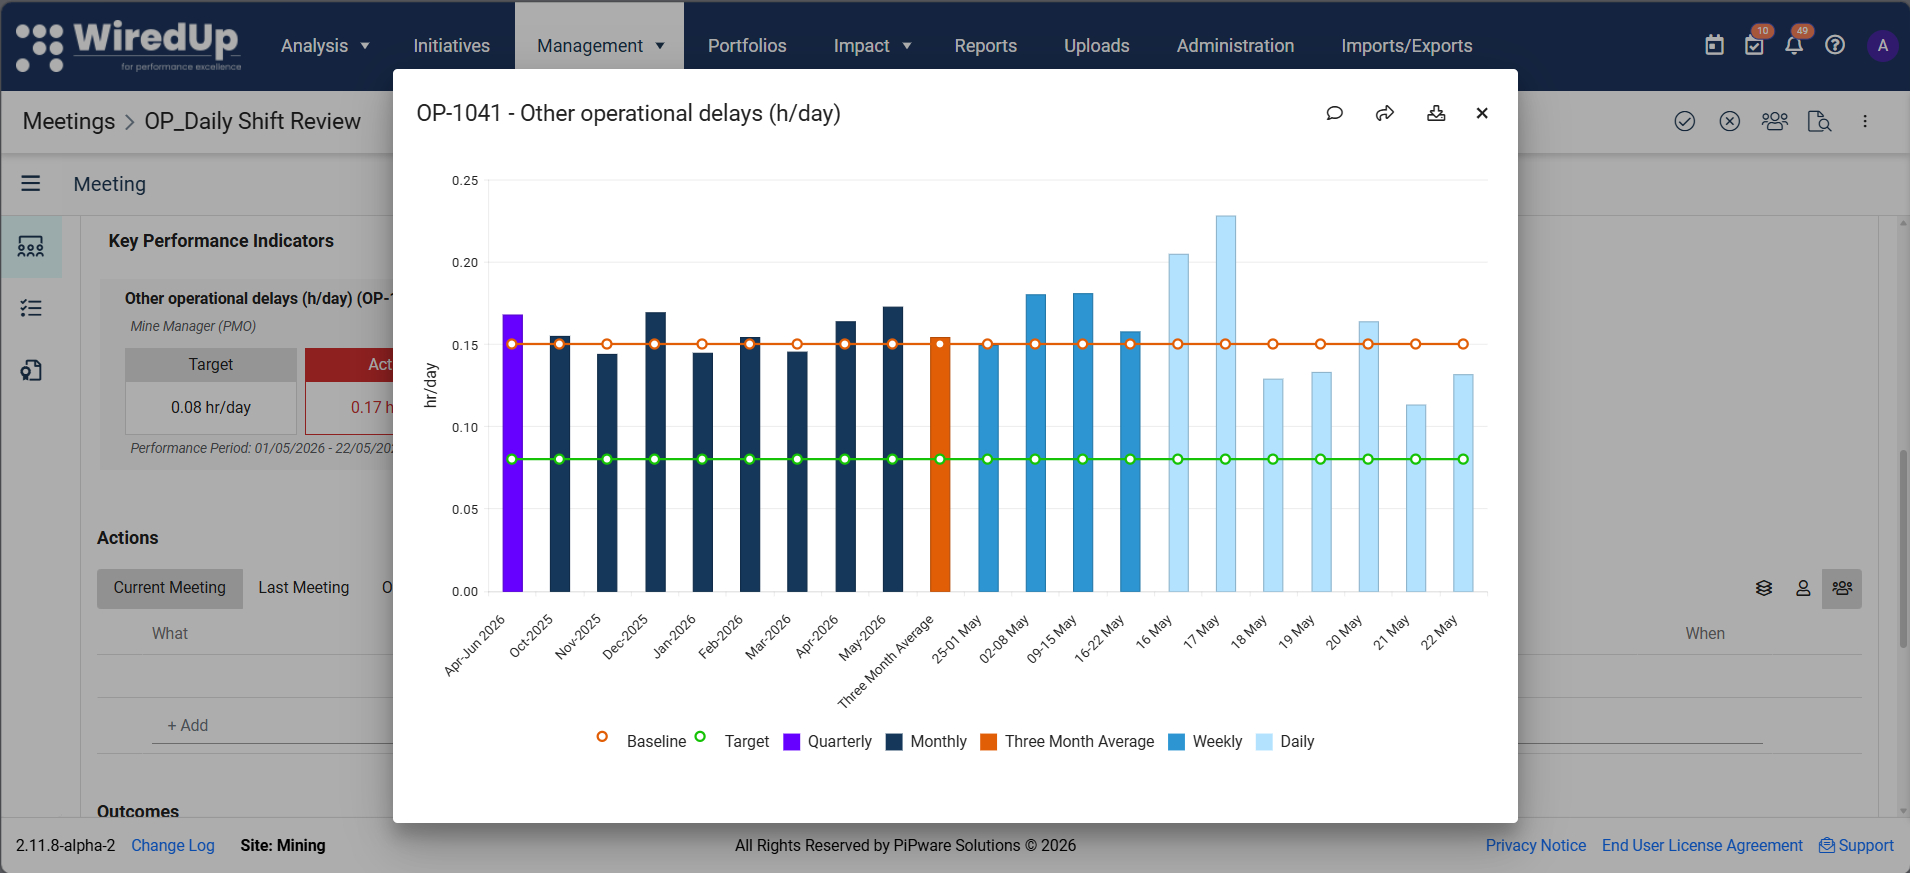
- Historical performance data
- Baseline and target lines
- Trend analysis
- KPI chart actions:
- Show/Hide comments: Toggle the display of comments on the KPI
- Navigate to KPI: Click the arrow icon to open the full KPI details page
- Download KPI: Export the KPI chart and data
Note: You cannot update KPI values and status directly from meetings. KPI updates must be made in the KPIs module.
- Ideas/Initiatives to Review
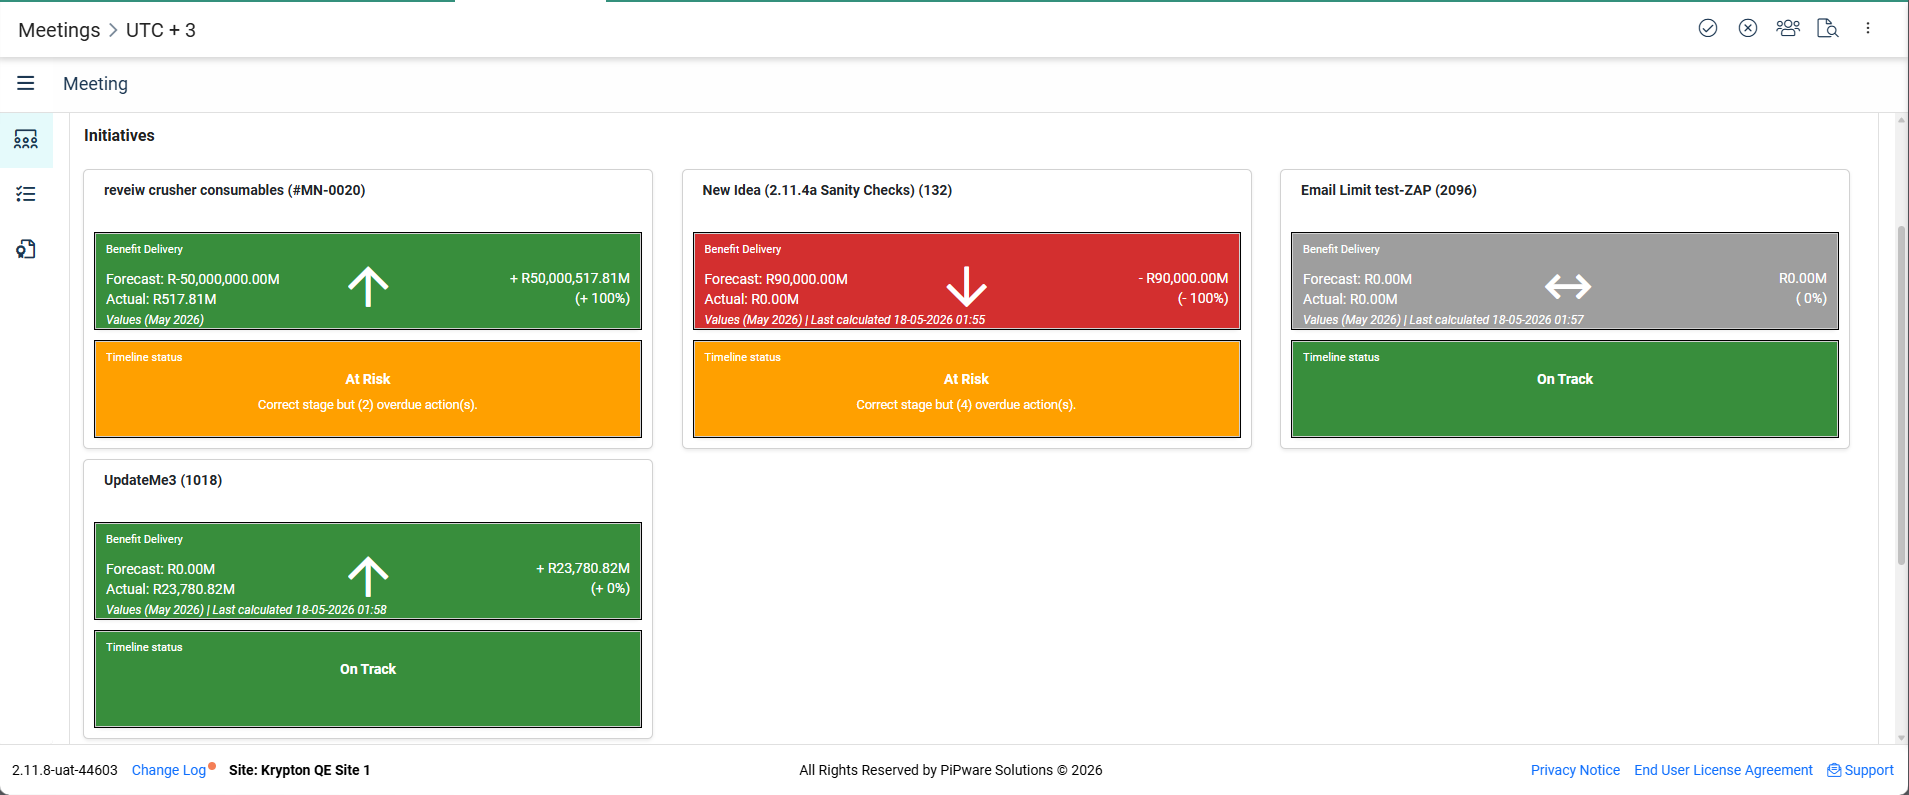
- Evaluate ideas/initiatives linked to this process
- Review idea/initiative details and progress
- When you click on an idea/initiative tile, it navigates you to the Ideas module where you can view full details
- Note: Clicking an Initiative/Idea now opens the Performance page in a modal instead of navigating away, with an option to open the full page in a new tab.
- Reports & Attachments

- Access reports and documents relevant to this process
- Review data and supporting materials
- You can now delete attachments and links directly from Capture mode without needing to switch to Edit mode. Click the 'X' button to delete the attachment or link.
- Actions
- Create, view, and manage action items for this process
- Actions are automatically tracked and linked to the process
Action Comments: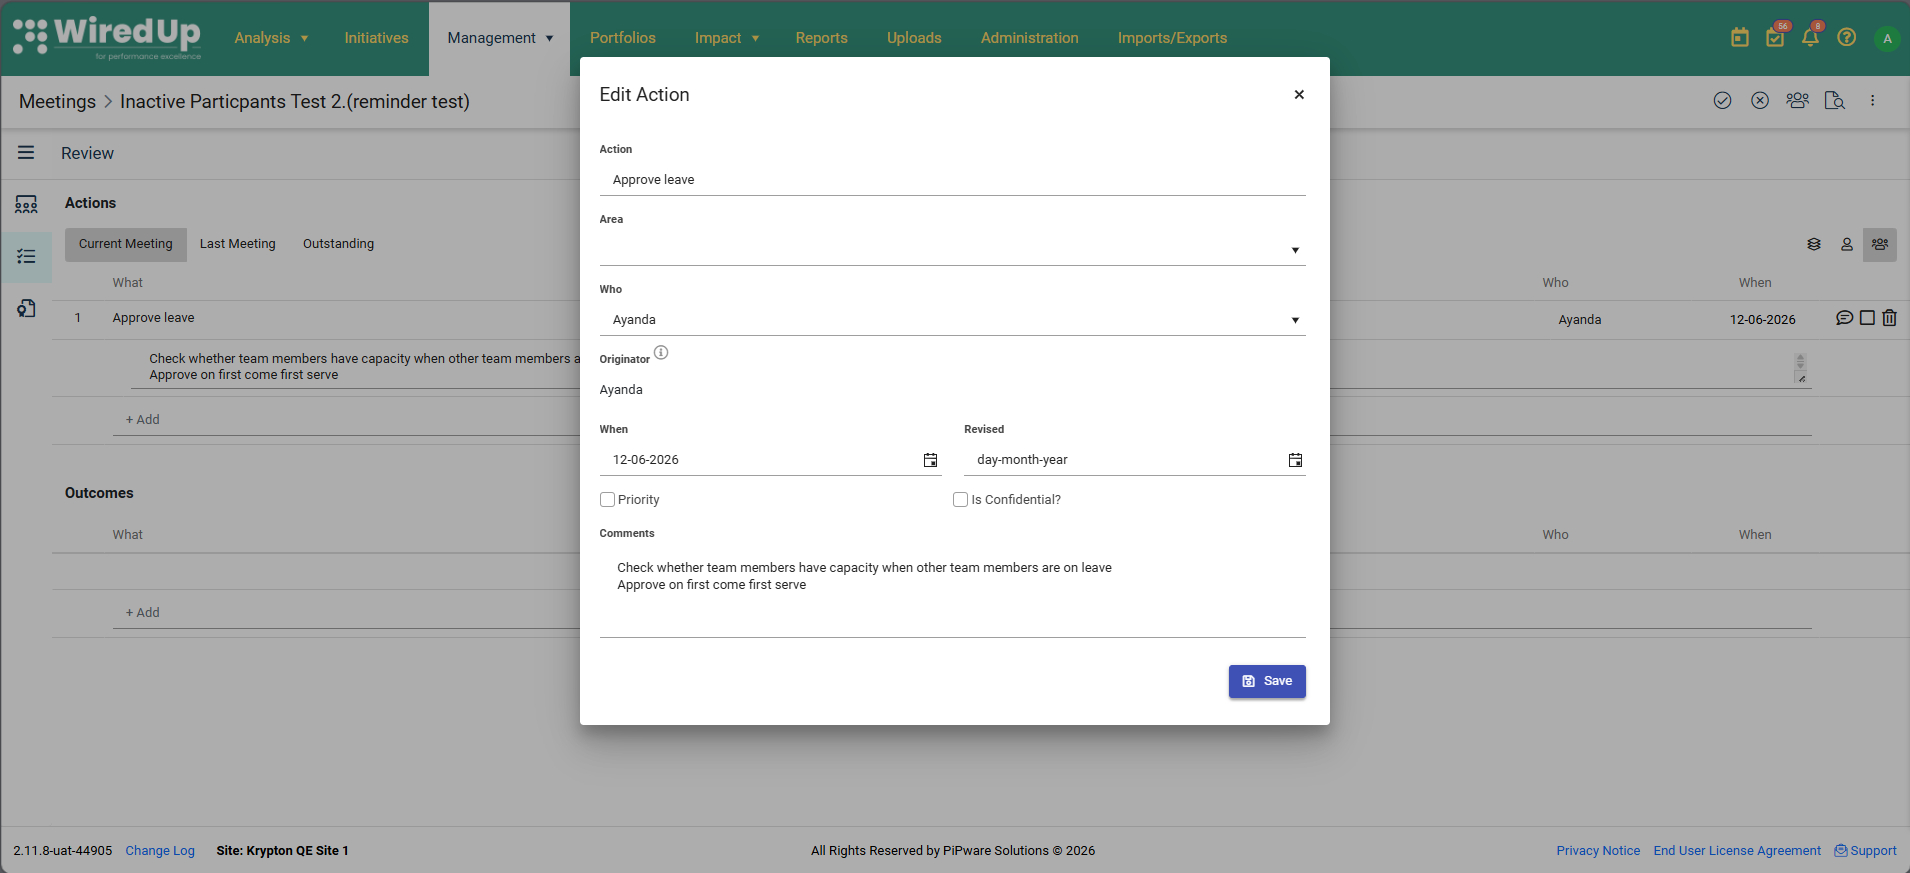
When you create or edit actions in Meetings and RARs, you can now add and edit comments directly within the action dialogue, regardless of where you access the action from.
Previously, comments for Meeting and RAR actions were only visible inline beneath the action row within the source module. Now, the Comment field appears at the bottom of every action dialogue across the platform—including when you open actions from Dashboards, My Actions, or when viewing Meeting actions from within the RAR module.
Any changes you make to a comment are saved to the action record and will be reflected in the inline display within the source module on the next page load. This ensures a consistent experience when managing action comments, no matter where you're working.
Inputting Process Actions
Actions are a critical component of meeting capture, ensuring that commitments are documented and tracked.
1. Adding Actions
To add an action to a process:
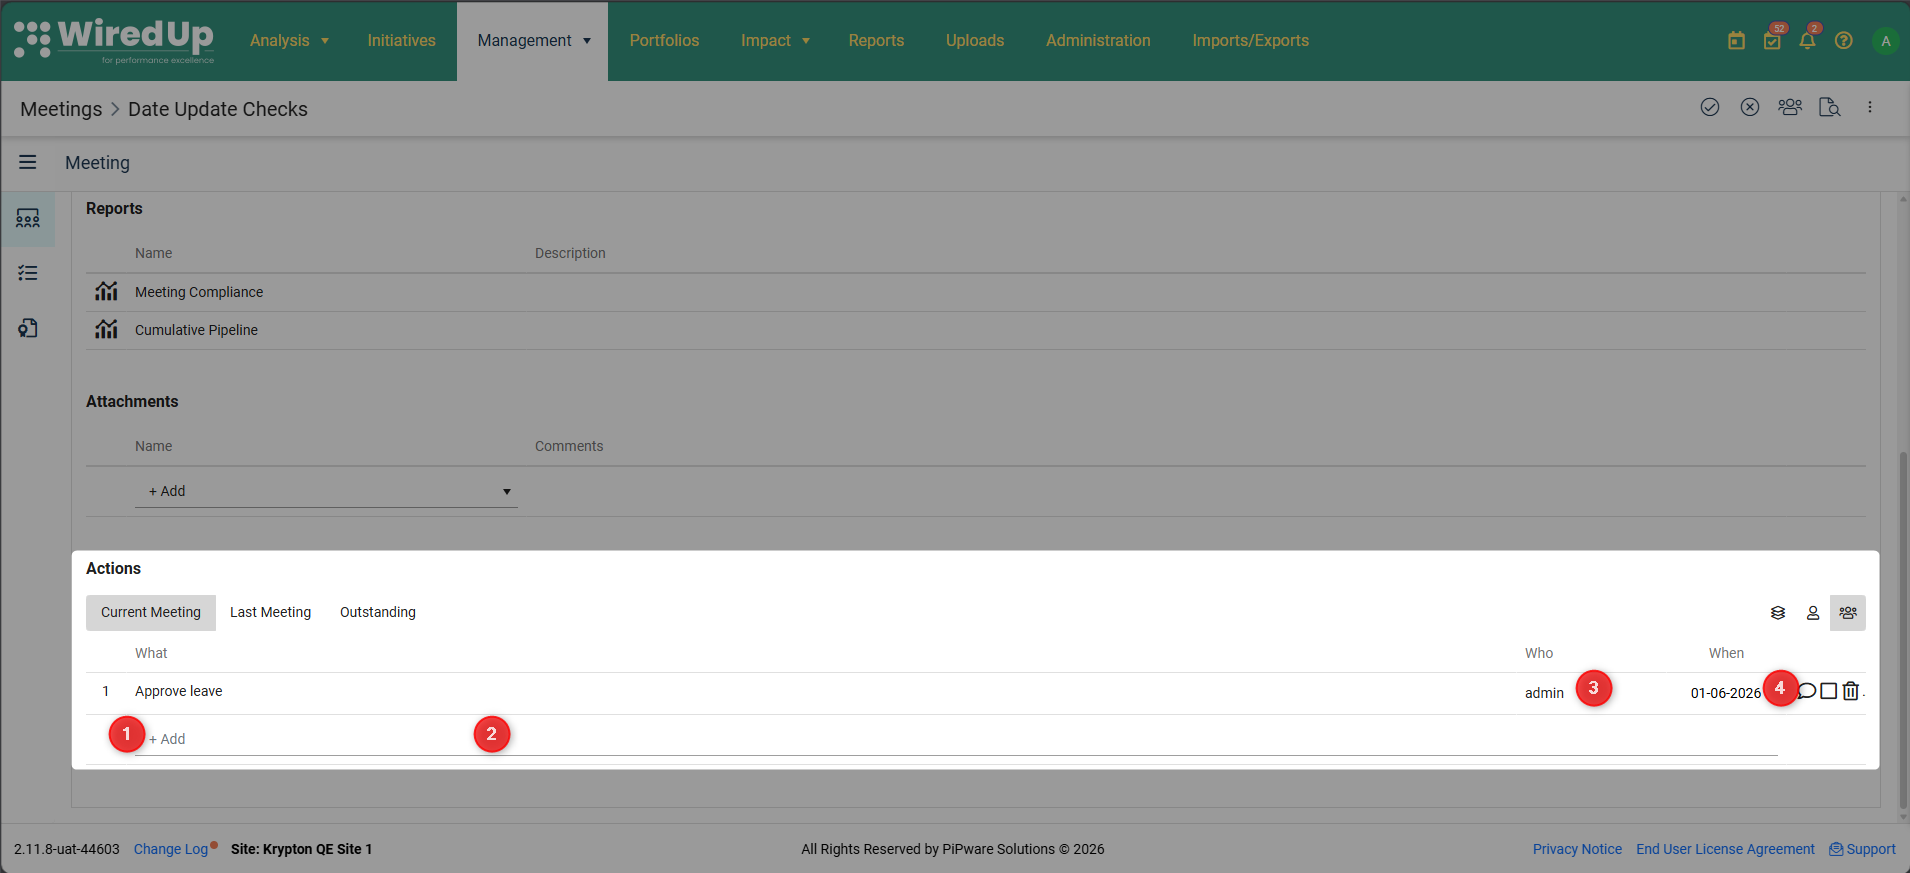
- Click the +Add button located at the bottom of the Actions section
- Enter the action details and click Enter
- The action owner is automatically assigned the action. Click the owner name to update the action owner
- The action due date is automatically assigned 1week after meeting instance date. To assign a different due date, click on the date to update it
2. Managing Actions
For each action, you can:
- View/Add comments: Click the comment icon to view or add comments associated with the action
- Mark as complete: Click the checkbox to mark the action as complete
- Remove an action: Click the delete icon to remove the action
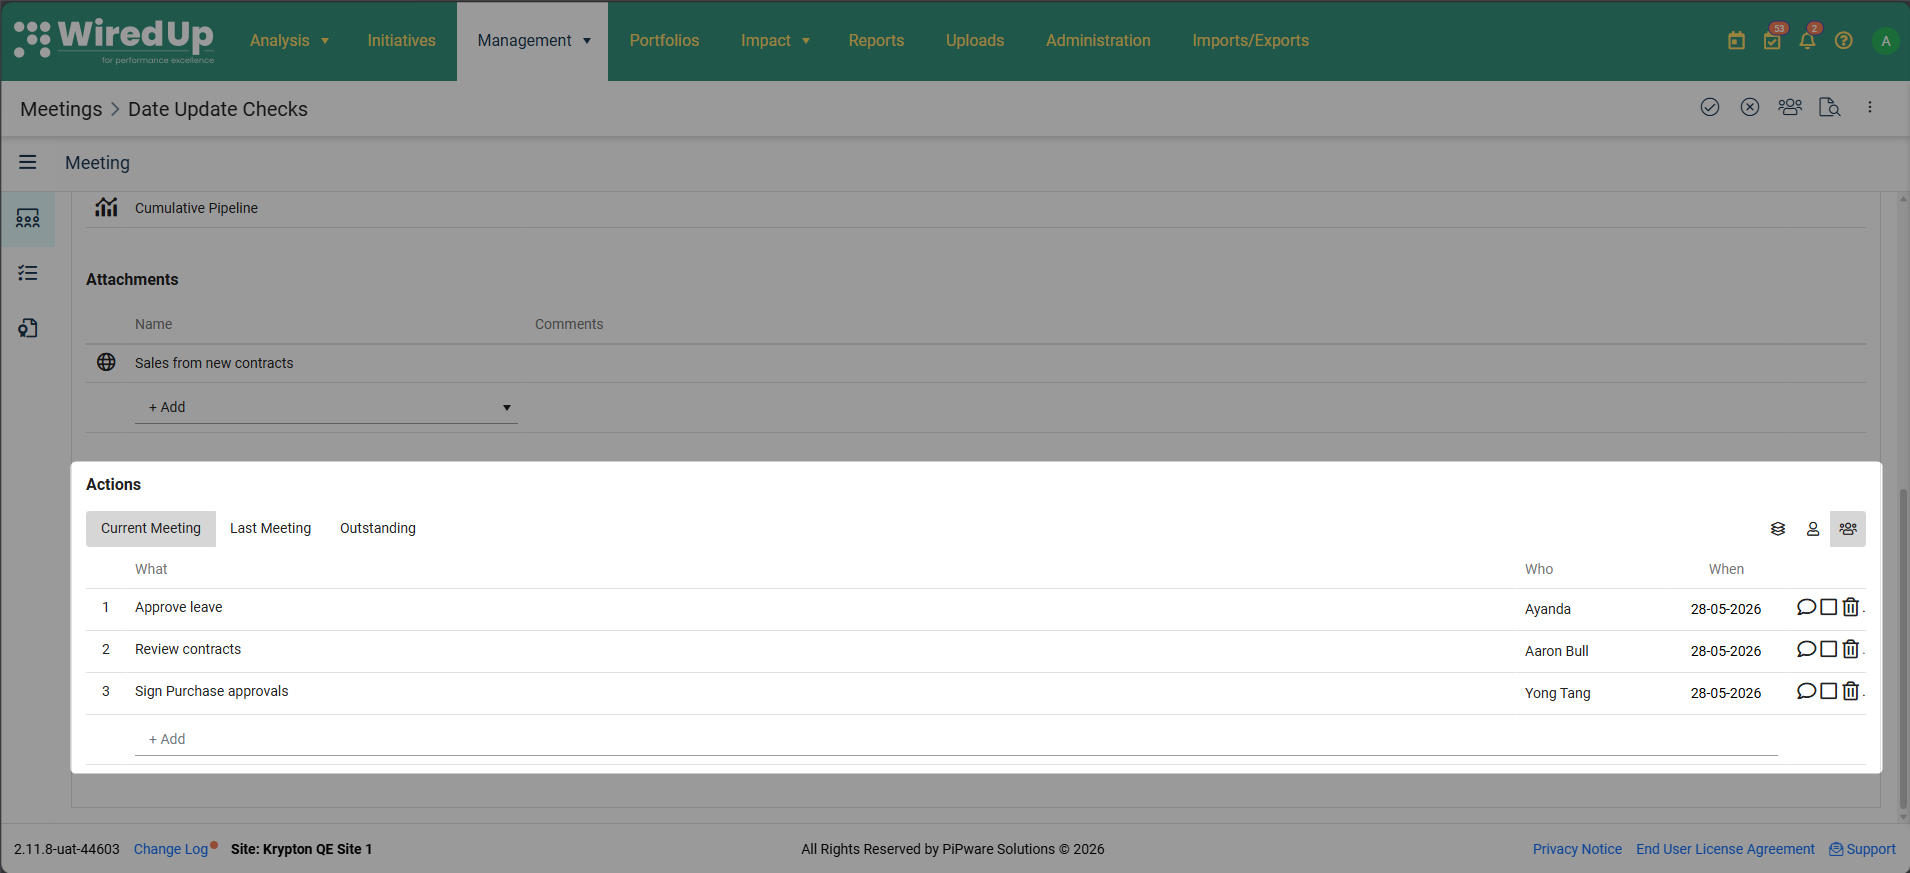
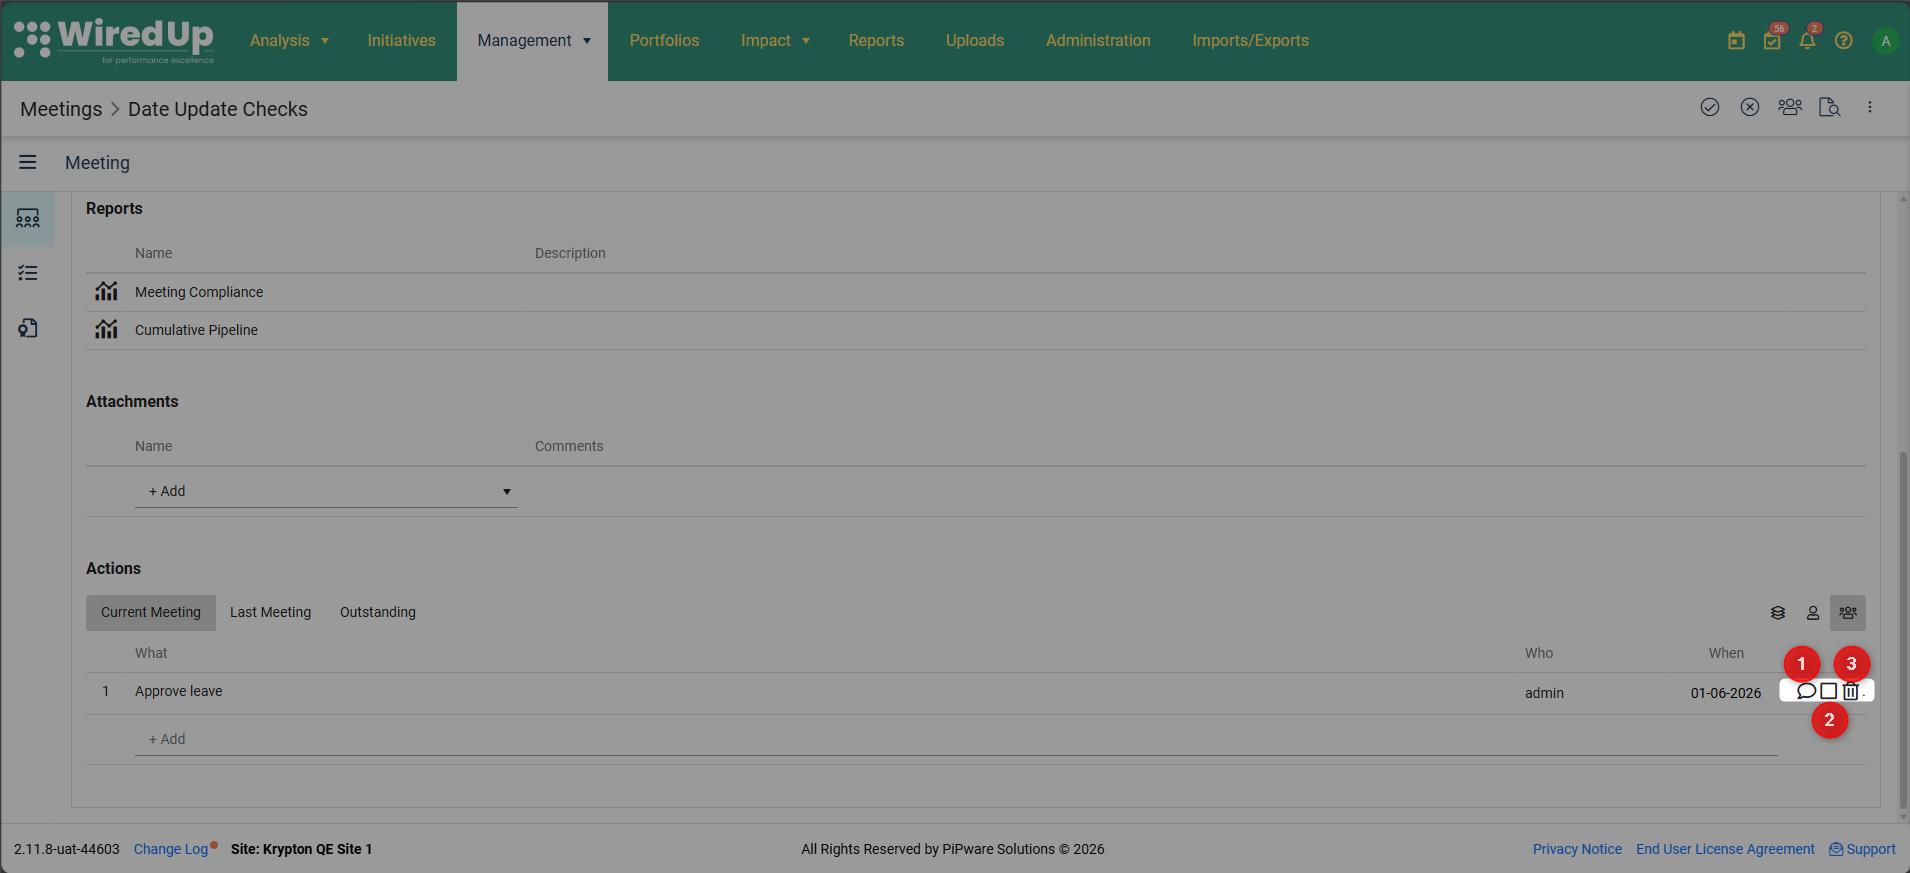
3. Action Views
Use the icons located on the top-right side of the Actions section to filter actions:
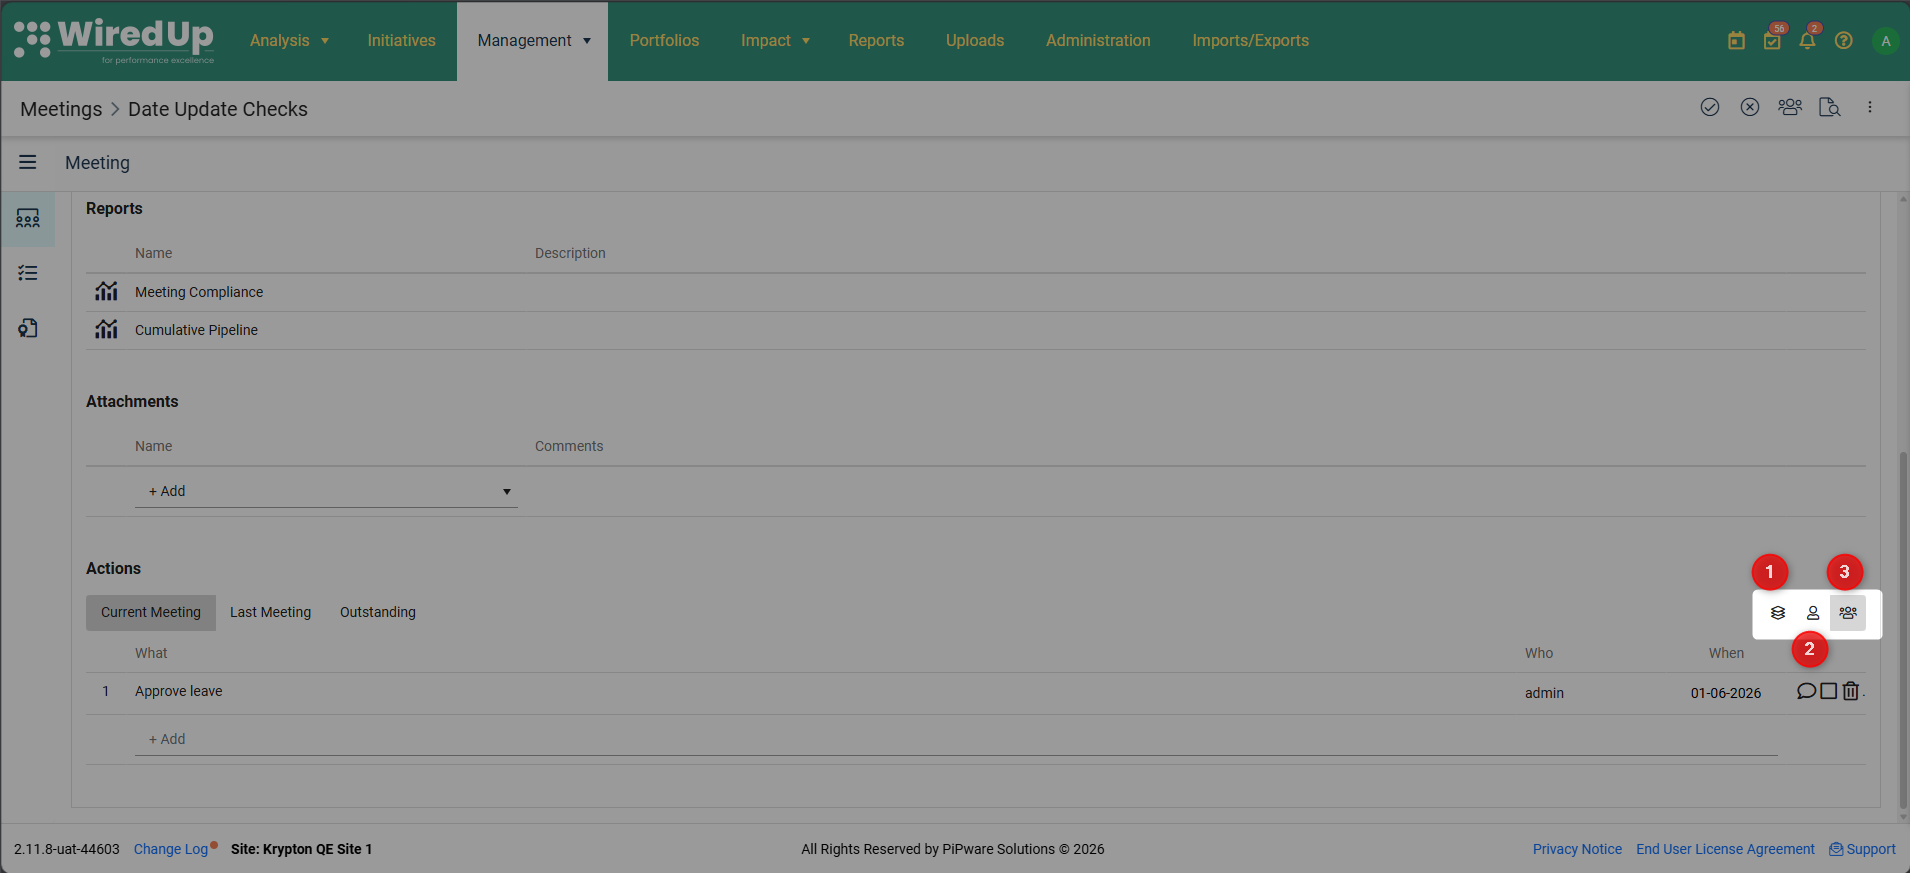
- Meeting Action Area: Shows all actions related to the current meeting instance
- My Actions: Displays only actions assigned to you
- All Actions: Shows all actions across all meeting instances
4. Action Timeline Views
You can also view actions by timeline:
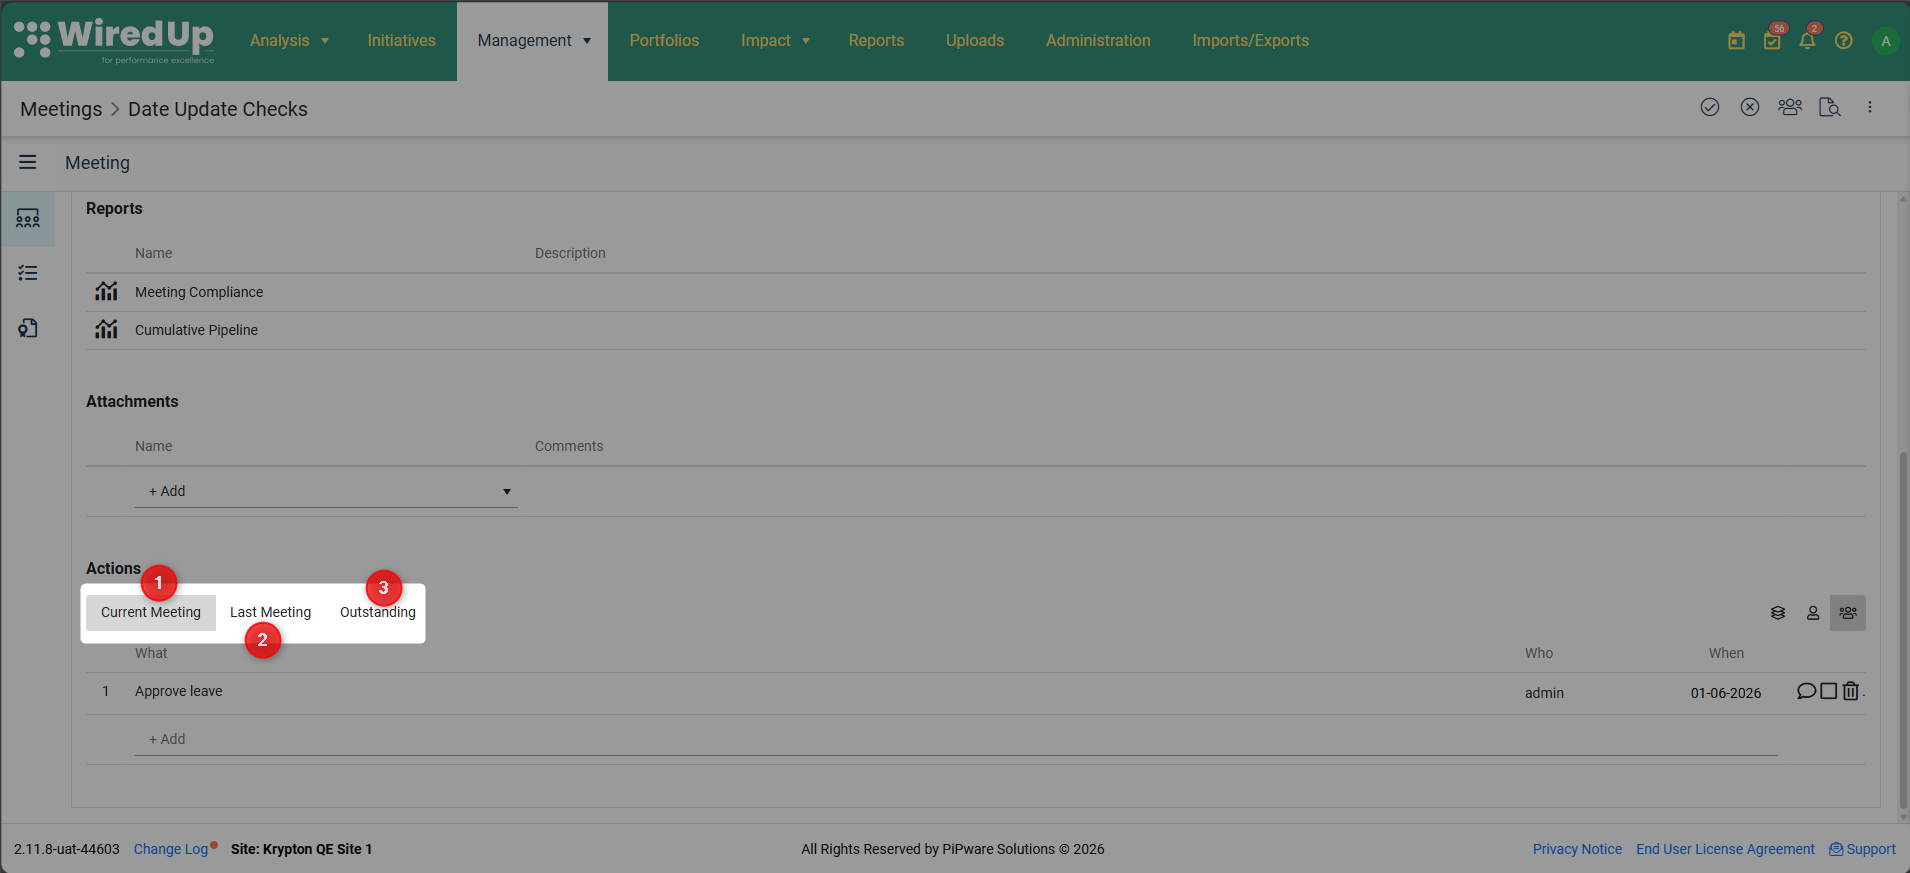
- Current Meeting: Actions created in the current meeting instance
- Last Meeting: Actions from the previous meeting instance
- Outstanding: All incomplete actions across all meetings
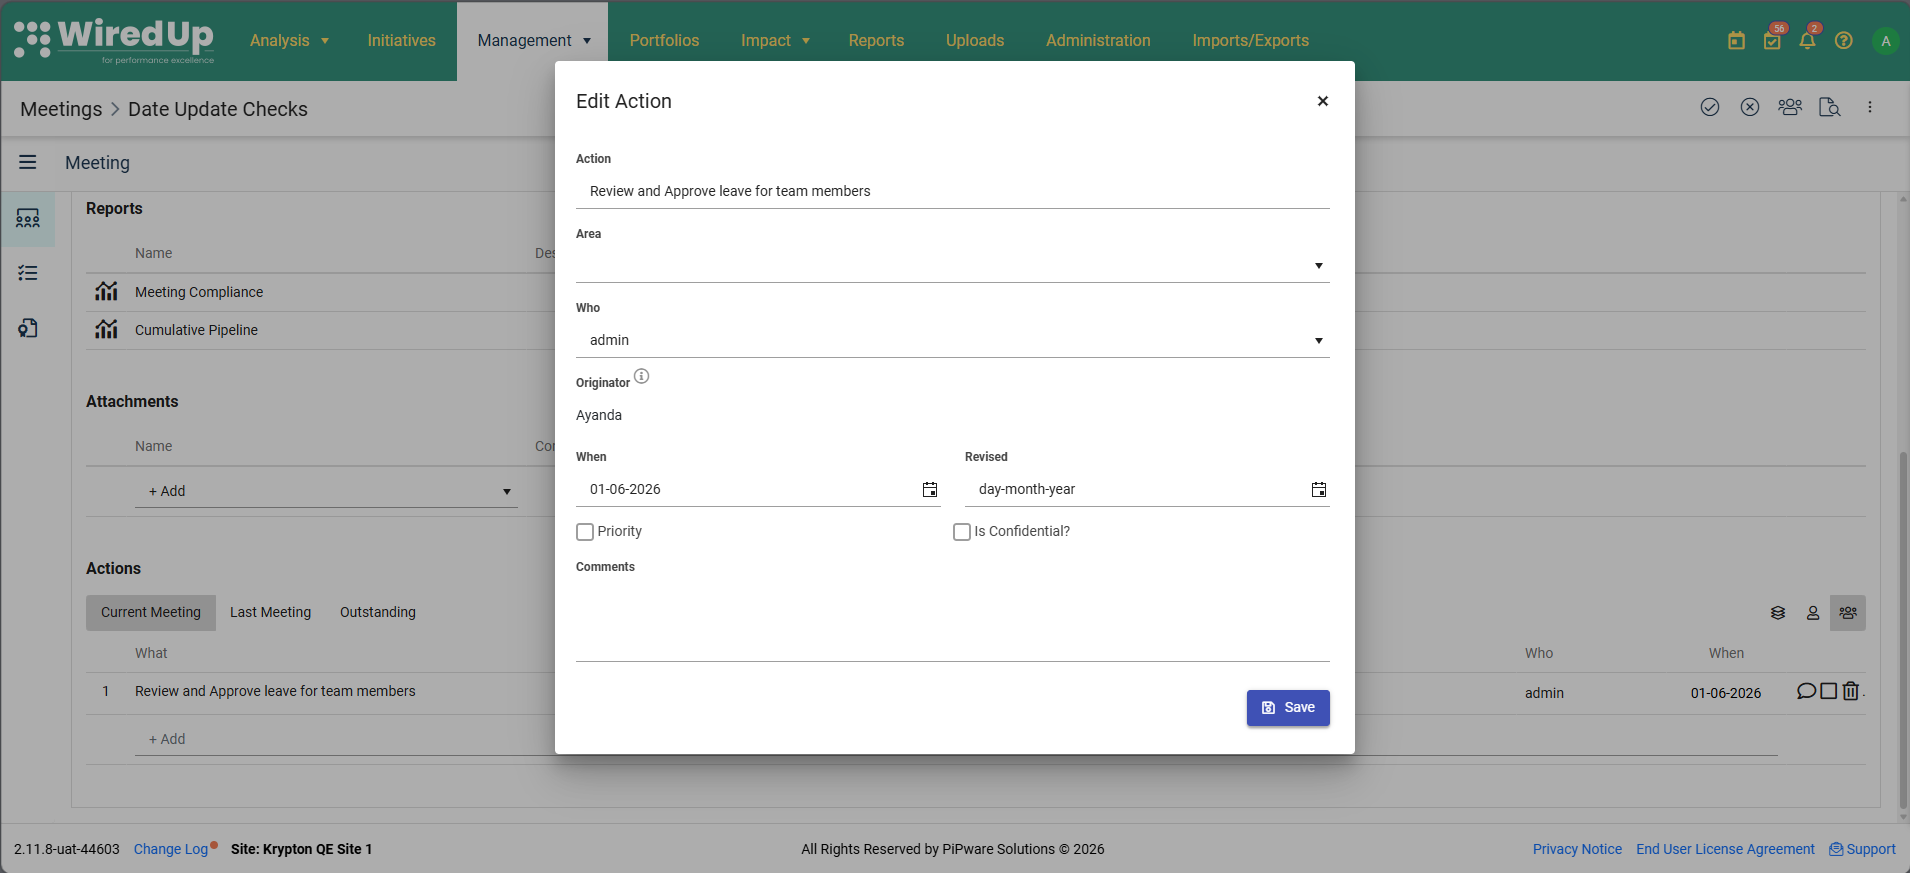
5. Edit Action
To edit an action, click on the action title and the Edit Action screen will be displayed
Review Tab
The Review section provides a consolidated view of all actions and outcomes from the meeting.
Accessing the Review Tab
To access the Review section:
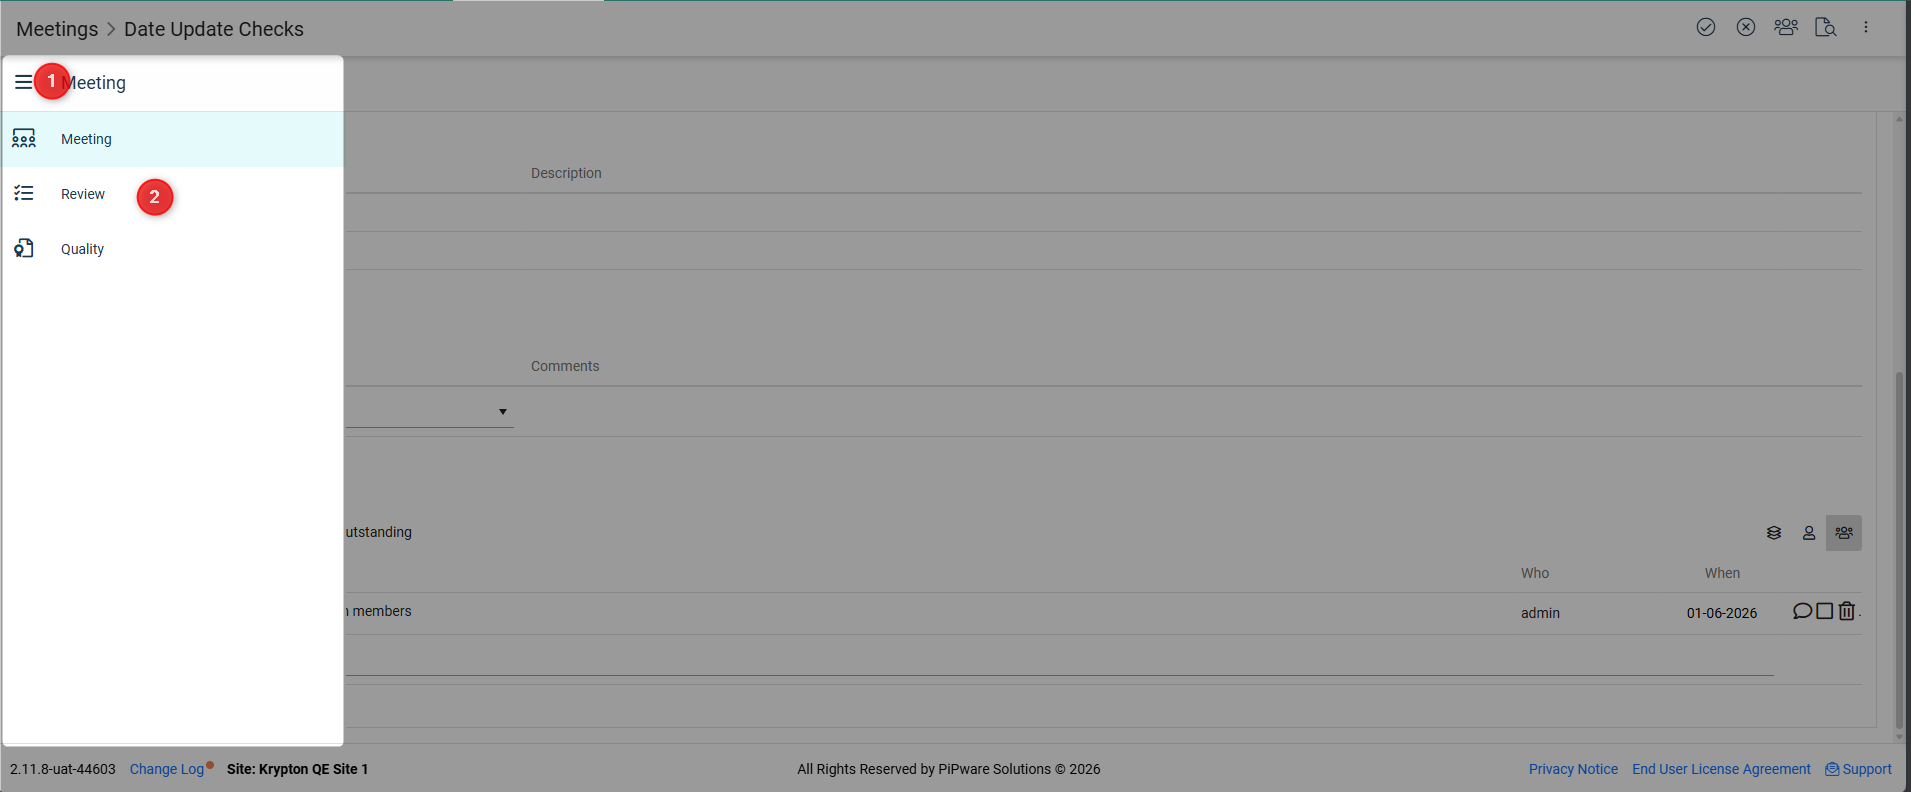
- Click the 3-bar menu (hamburger menu) on the left side of the screen
- Select Review from the menu
Review Section Features
In the Review section, you can:
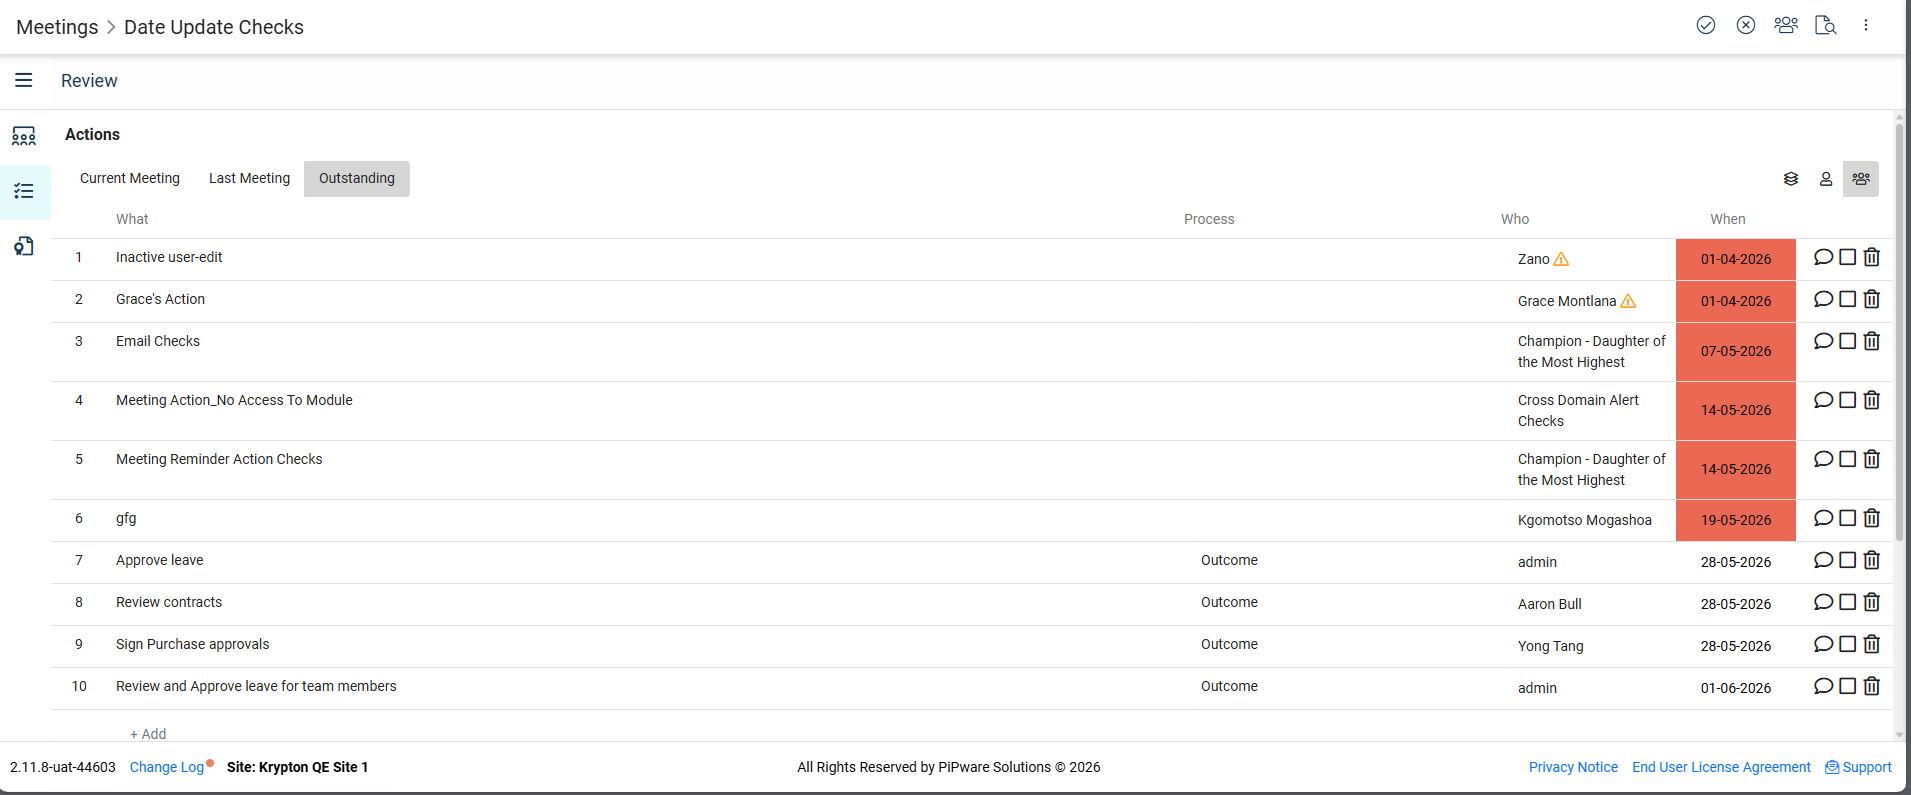
Review Actions
- View all actions created during the meeting
- See actions organized by process or as general meeting actions
- Filter actions by Meeting Action Area, your own actions, or all actions
Review Outcomes
- Document key outcomes and results from the meeting
- Record achievements and progress made
Add General Actions
Actions not specific to a particular process can be added here:
- Click the +Add button at the bottom of the Actions section
- Enter action details
- These actions are linked to the meeting but not to a specific process item
Manage Actions
Similar to the Meetings tab, you can:
- Input comments on actions
- Mark actions as complete
- Delete actions if needed
Quality Tab
The Quality section allows you to evaluate the effectiveness of the meeting using predefined quality questions.
Accessing the Quality Tab
To access the Quality section:
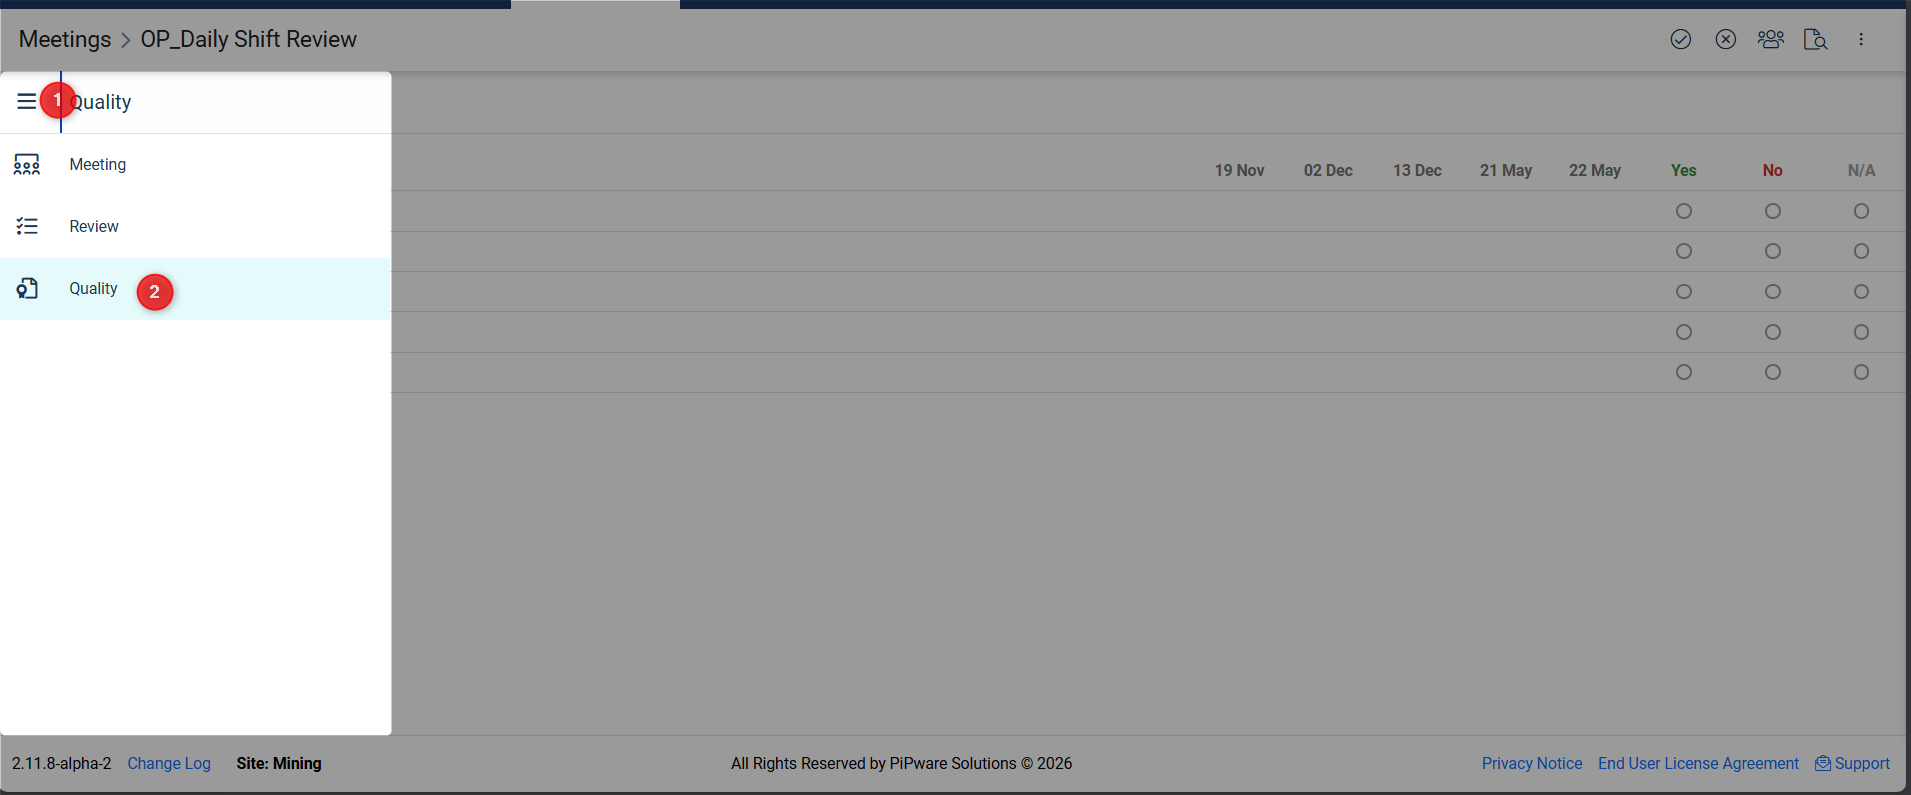
- Click the 3-bar menu on the left side of the screen
- Select Quality from the menu
2. Answering Quality Questions
In the Quality section:
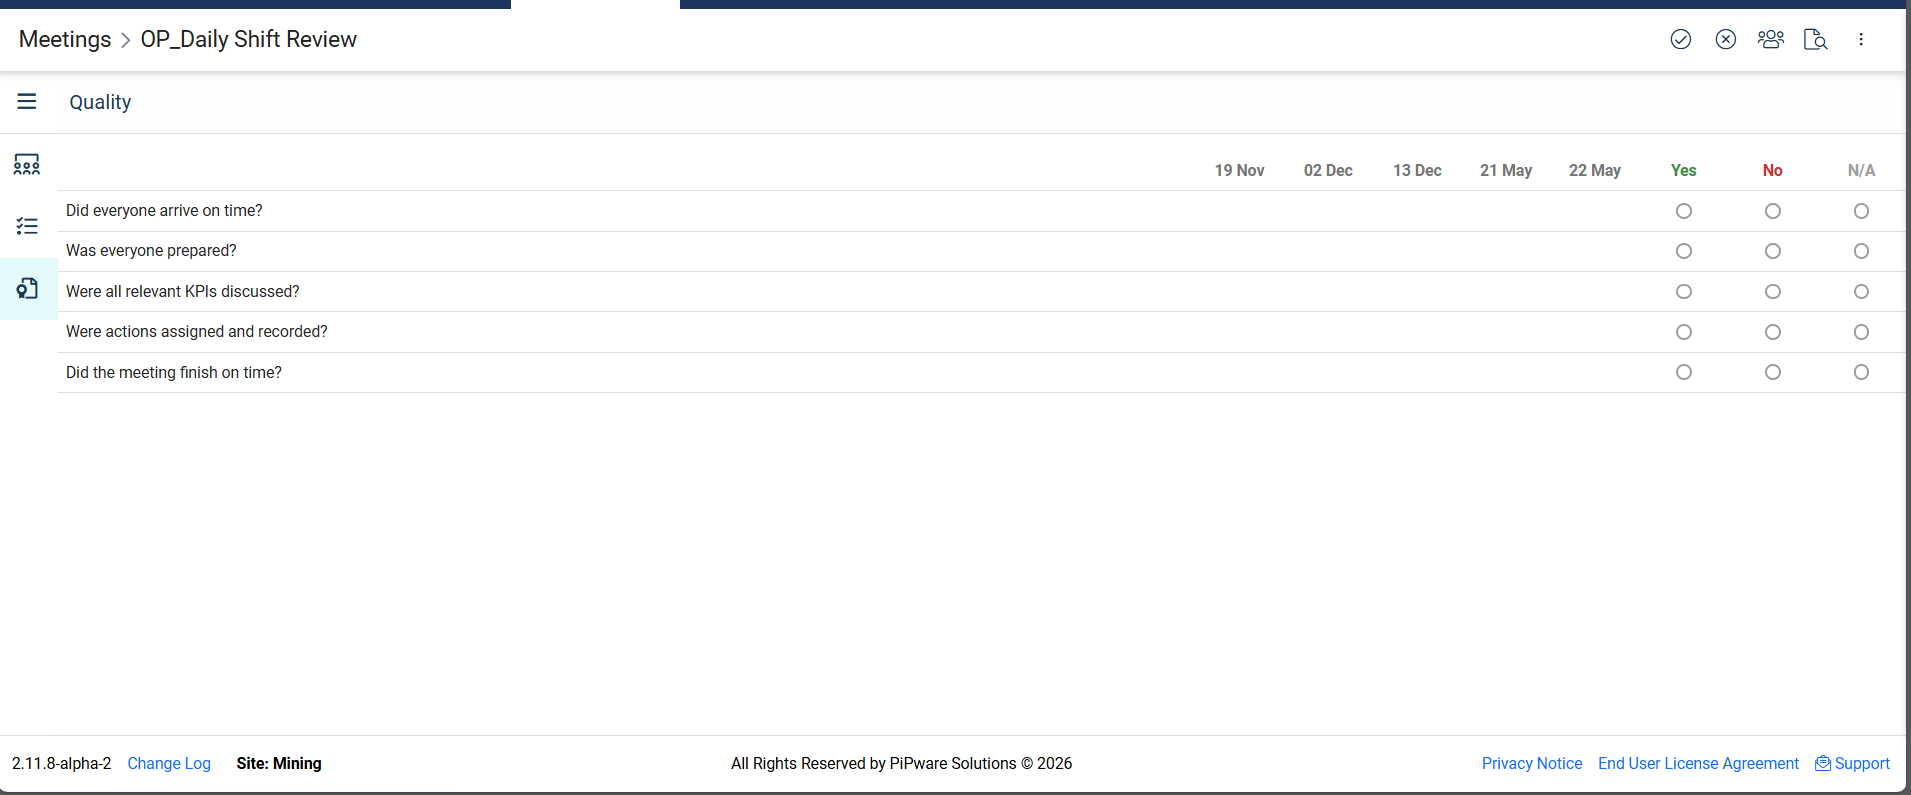
- Review the meeting quality questions selected for the meeting (as per the meeting definition)
- Answer each question based on your assessment of the meeting
- Questions may include ratings, yes/no responses, or text feedback
- Your responses help track meeting effectiveness over time
3. Editing Meeting Quality Questions
Meeting Quality questions can be managed by administrators:
- Navigate to Administration > Meeting Quality Questions
- Add, edit, or delete quality questions
- Updated questions will be available for selection when configuring meeting series
Saving Your Work
Auto-Save
- WiredUp automatically saves your progress as you capture meeting details
- You don't need to manually save after each entry
Completing the Meeting
Once you have finished capturing all meeting details:
- Review all process items to ensure completeness
- Verify that all actions have been created and assigned
- Click the Complete icon in the toolbar to mark the meeting as complete
Next Steps
- Edit a meeting series: Make changes to meeting details, processes, or participants
- Add a new meeting: Create additional meeting series
- View meeting reports: Analyze meeting effectiveness and action completion rates
- Manage meeting categories: Organize meetings by category
- Configure meeting quality questions: Set up questions to evaluate meeting effectiveness